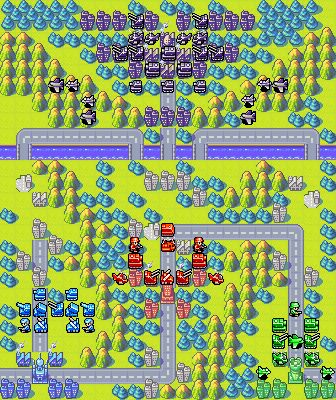
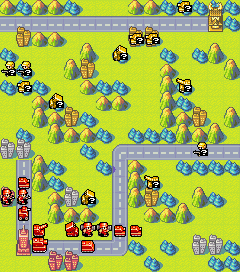
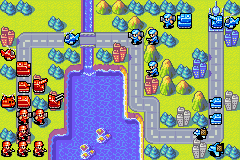
Mission 6 – Blizzard Battle!
CO Choice:
 | Doesn’t Olaf get cold when he makes it snow? |
 | Let’s take it to ’em! |
Mission 6 – Blizzard Battle!
CO Choice:
| Doesn’t Olaf get cold when he makes it snow? |
| Let’s take it to ’em! |
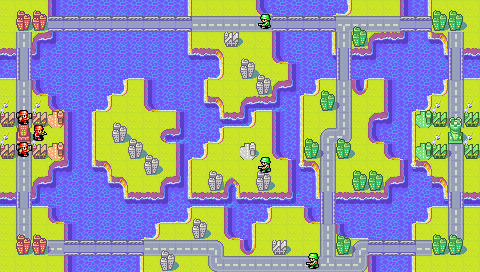
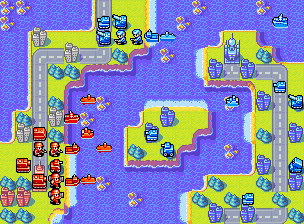
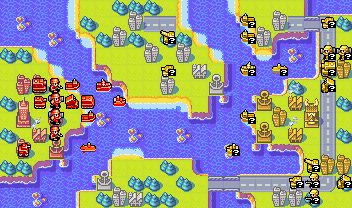
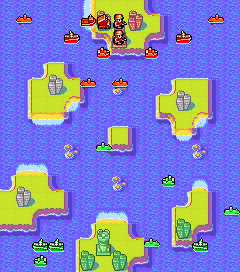
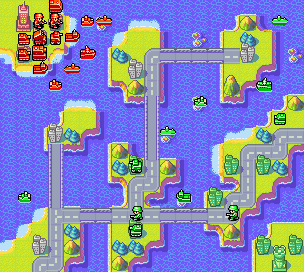
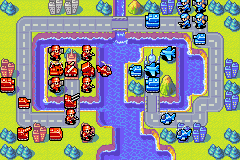
Mission 7 – Olaf’s Sea Strike!
CO Choice:
| Is it my turn? |
| Olaf’s got another think coming if he thinks he can beat me! |
.png) |
 |
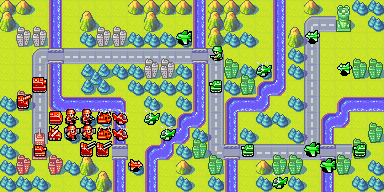
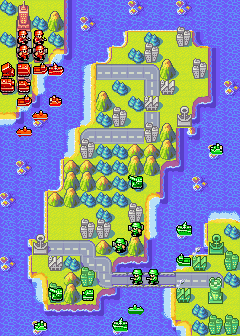
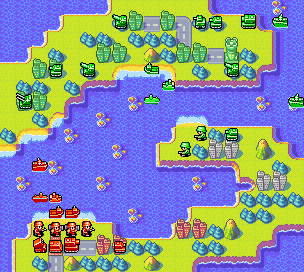
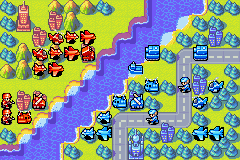
Mission 7 – History Lesson
CO Choice: Max
| Let me take care of Grit! |
.png) |
 |
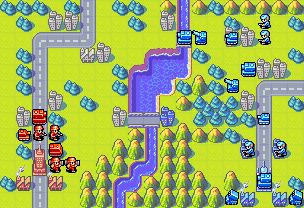
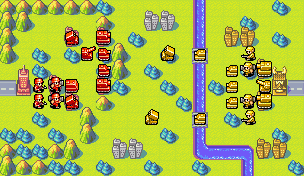
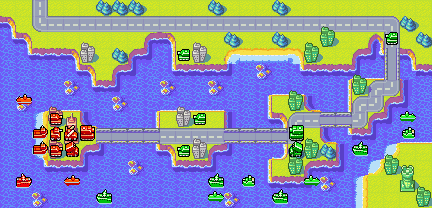
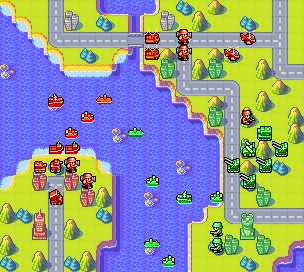
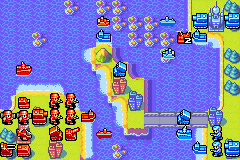
Mission 8 – Sami’s Debut!
CO Choice:
| Those troops… could it be? |
| It’s that guy again! |
 | This terrain is made for me! |
.png) |
 |
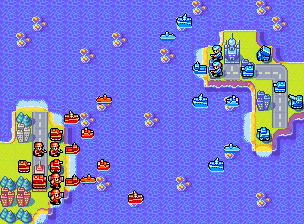
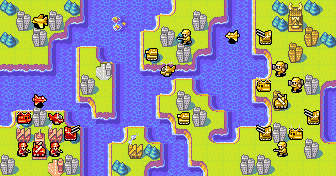
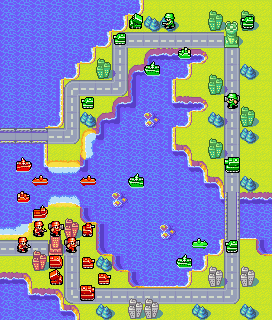
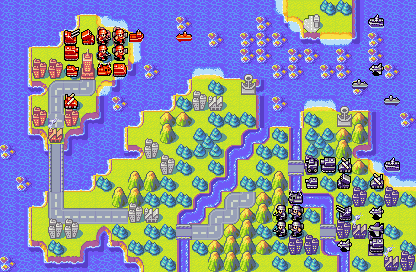
Mission 9 – Kanbei Arrives
CO Choice:
| I don’t know what’s going on, but I’ll do my best. |
| Darn! I hadn’t planned on crossing into Yellow Comet… Well, here goes |
| If we could just negotiate… I think it’s too late for that, though. |
CO Choice: Max
|
Kanbei’s army is so cool! |
|
That Kanbei is one tough cookie! |
|
We can’t get careless |

Mission 11 – Kanbei’s Error?
CO Choice:
| My units haven’t lost yet! |
| The front line is where I’ll win this battle! |
| This map call for some strategic maneuvering. |
Mission 12 – Divide & Conquer!
CO Choice: Max
| Hey! Where is everybody? |
.png) |
 |
Mission 13 – Sami Marches On!
CO Choice: Sami
| Sonja! |
.png) |
 |
Mission 14 – Sonja’s Goal!
CO Choice: Andy
| Boy… Sami’s scary when she’s mad. |
.png) |
 |
Mission 15 – Captain Drake!
CO Choice: Andy
| This looks like the place for me! |
Note: This map is different if you choose Max or Sami as your CO.
Please refer to C15M – Captain Drake! or C15S – Captain Drake! guides respectively.
Mission 15 – Captain Drake!
CO Choice: Max
| This is right up my alley! |
.png) |
 |
Note: This map is different if you choose Andy or Sami as your CO.
Please refer to C15A – Captain Drake! or C15S – Captain Drake! guides respectively.
Mission 15 – Captain Drake!
CO Choice: Sami
| Hmm… this could be a tough nut to crack. |
.png) |
 |
Note: This map is different if you choose Andy or Max as your CO.
Please refer to C15A – Captain Drake! or C15M – Captain Drake! guides respectively.
Mission 16 – Naval Clash!
CO Choice: Andy
| I’ll take this route. |
.png) |
 |
Note: This map is different if you choose Max or Sami as your CO.
Please refer to C16M – Naval Clash! or C16S – Naval Clash! guides respectively.
Mission 16 – Naval Clash!
CO Choice: Max
| Send me this way. |
.png) |
 |
Note: This map is different if you choose Andy or Sami as your CO.
Please refer to C16A – Naval Clash! or C16S – Naval Clash! guides respectively.
Mission 16 – Naval Clash!
CO Choice: Sami
| If it’s up to me, I’ll go here. |
.png) |
 |
Note: This map is different if you choose Andy or Max as your CO.
Please refer to C16A – Naval Clash! or C16M – Naval Clash! guides respectively.
Mission 17 – Wings of Victory!
CO Choice: Andy
| Eagle? Let me take him! |
Note: This map is different if you choose Max or Sami as your CO.
Please refer to C17M – Wings of Victory! or C17S – Wings of Victory! guides respectively.
Mission 17 – Wings of Victory!
CO Choice: Max
| I’m always ready to go! |
Note: This map is different if you choose Andy or Sami as your CO.
Please refer to C17A – Wings of Victory! or C17S – Wings of Victory! guides respectively.
Mission 17 – Wings of Victory!
CO Choice: Sami
| I’ve got to get the job done this time! |
.png) |
 |
Note: This map is different if you choose Andy or Max as your CO.
Please refer to C17A – Wings of Victory! or C17M – Wings of Victory! guides respectively.
Mission 18 – Battle Mystery!
CO Choice: Andy
| I really like battling Drake! |
.png) |
 |
Note: This map is different if you choose Max or Sami as your CO.
Please refer to C18M – Battle Mystery! or C18S – Battle Mystery! guides respectively.
Mission 18 – Battle Mystery!
CO Choice: Max
| Yeah, I’ll take care of this! |
Note: This map is different if you choose Andy or Sami as your CO.
Please refer to C18A – Battle Mystery! or C18S – Battle Mystery! guides respectively.
Mission 18 – Battle Mystery!
CO Choice: Sami
| That Tsunami’s so annoying! |
.png) |
 |
Note: This map is different if you choose Andy or Max as your CO.
Please refer to C18A – Battle Mystery! or C18M – Battle Mystery! guides respectively.
Mission 19 – Andy Times Two!
CO Choice:
| Someone’s already fighting! I’ve got to help! |
| The enemy has been sighted! |
| I wonder if Eagle’s okay. |

Mission 20 – Enigma
CO Choice:
| There’s no time! Let’s go! |
| Time to bring it! |
| Eagle… Be careful. |
There are different paths you can take in the Campaign mode, some require specific CO for one or more maps, while others might require certain actions. For specifics, check the “Branching Paths, Extra Missions, and Unlocking COs” section on the overview page.
| Cost – 18000 | |||||||
 |
 |
 |
 |
||||
 |
 |
 |
 |
||||
| Cruisers are strong against subs and air units, and they can carry two copter units. Continue reading | |||||||
 (1) | (2) |  (1) | (2) |  (1) | (2) |  (1) | (2) |  (1) | (2) |  (1) | (2) |  (1) | (2) |  (1) | (2) |  (1) | (2) |  (1) | (2) |  (1) | (2) |  (1) | (2) |  (1) | (2) |  (1) | (2) |  (1) |  (1) |  (1) |  (1) | |||
|---|---|---|---|---|---|---|---|---|---|---|---|---|---|---|---|---|---|---|---|---|---|---|---|---|---|---|---|---|---|---|---|---|---|---|
 | - | 55 | - | 45 | - | 12 | - | 5 | - | 1 | - | 14 | - | 15 | - | 25 | | - | 5 | - | 25 | - | - | - | - | - | 7 | - | 30 | - | - | - | - | |
 | - | 65 | - | 55 | 85 | 18 | 55 | 6 | 15 | 1 | 75 | 20 | 70 | 32 | 85 | 35 | | 65 | 6 | 85 | 35 | - | - | - | - | - | 9 | - | 35 | - | - | - | - | |
 | - | 70 | - | 65 | - | 35 | - | 6 | - | 1 | - | 45 | - | 45 | - | 55 | - | - | 4 | - | 28 | - | - | - | - | - | 10 | - | 35 | - | - | - | - | |
 | 25 | 75 | 25 | 70 | 85 | 40 | 55 | 6 | 15 | 1 | 75 | 45 | 70 | 45 | 85 | 55 | | 65 | 5 | 85 | 30 | - | - | - | - | - | 10 | - | 40 | 1 | 5 | 10 | 1 | |
 | 30 | 105 | 30 | 95 | 105 | 45 | 85 | 8 | 55 | 1 | 105 | 45 | 105 | 45 | 105 | 55 | | 105 | 7 | 105 | 35 | - | - | - | - | - | 12 | - | 45 | 10 | 55 | 35 | 10 | |
 | 90 | - | 85 | - | 80 | - | 70 | - | 45 | - | 70 | - | 75 | - | 80 | - | | 75 | - | 80 | - | - | - | - | - | - | - | - | - | 40 | 65 | 55 | 60 | |
 | 95 | - | 90 | - | 90 | - | 80 | - | 55 | - | 80 | - | 80 | - | 85 | - | | 85 | - | 90 | - | - | - | - | - | - | - | - | - | 55 | 85 | 60 | 85 | |
 | 105 | - | 105 | - | 60 | - | 25 | - | 10 | - | 50 | - | 50 | - | 55 | - | | 45 | - | 55 | - | 65 | - | 75 | - | 120 | - | 120 | - | - | - | - | - | |
 | - | - | - | - | - | - | - | - | - | - | - | - | - | - | - | - | | - | - | - | - | 100 | - | 100 | - | 120 | - | 120 | - | - | - | - | - | |
 | - | - | - | - | - | - | - | - | - | - | - | - | - | - | - | - | | - | - | - | - | 55 | - | 100 | - | 100 | - | 100 | - | - | - | - | - | |
 | 110 | - | 110 | - | 105 | - | 105 | - | 95 | - | 105 | - | 105 | - | 105 | - | | 95 | - | 105 | - | - | - | - | - | - | - | - | - | 75 | 85 | 95 | 95 | |
 | - | 75 | - | 75 | 55 | 30 | 55 | 6 | 25 | 1 | 60 | 20 | 65 | 25 | 65 | 35 | | 25 | 6 | 65 | 35 | - | - | - | - | - | 65 | - | 95 | 25 | 55 | 25 | 25 | |
 | 95 | - | 90 | - | 90 | - | 80 | - | 55 | - | 80 | - | 80 | - | 85 | - | | 85 | - | 90 | - | - | - | - | - | - | - | - | - | 50 | 95 | 95 | 95 | |
 | - | - | - | - | - | - | - | - | - | - | - | - | - | - | - | - | | - | - | - | - | - | 55 | - | 65 | - | 115 | - | 115 | - | - | - | 90 | |
 | - | - | - | - | - | - | - | - | - | - | - | - | - | - | - | - | | - | - | - | - | - | - | - | - | - | - | - | - | 55 | 25 | 95 | 55 | |
The orange star troops are the attacker’s base damage. Blue Moon troops are the target of the attack. (1) represents a primary weapon that uses ammo, (2) represents the secondary machine guns that do not require ammo to fire. You can sort a target by damage taken by clicking the icon along the top row.
| Army: |  |
| A former pirate with a big heart. His naval units rule the seas, but he has trouble with air units. Rain seems to follow wherever he goes. | |
| “Panic is for landlubbers!” |
| Army: |  |
| The king of the skies who joined the air force to honor his father’s legacy. His air units are matchless, but he has weak naval units. | |
| “The Eagle soars above you!” |
Basic troop movement and attack controls are explained here.
 |
Briefing: First, let me brief you on the situation. We’re in this large nation here, Orange Star. The country to the east is Blue Moon. The two countries have been bitter rivals for years. Border skirmishes had died recently… until that madman Olaf… Oh, excuse me. I mean, uhm… The Blue Moon CO, Olaf, suddenly ordered an invasion of Orange Star. So, the Alara region is now held by Blue Moon forces. Candidate Advisor, you have been given a mission. You are to drive Olaf from Alara and secure the region for Orange Star. I will be your support. Let’s move out! |
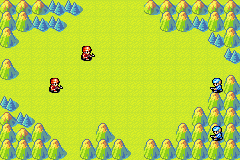
|
Briefing: Enemy forces have been spotted in the Alara Mountains. Their HQ is in another area, so we believe this is a covert attack. A covert attack… that sounds like something Olaf would try. Your goal is to take out these units. You’ve been given four Infantry units to carry out this operation. Let’s go! |

Capturing bases is the focus of this mission.
|
Briefing: Our current mission is to storm the Spire Hills. If successful, we should be able to drive that pompous, old… I mean, we should be able to force the Blue Moon forces to withdraw. If you remember, we faced two mech units in the last battle, right? In response, you have been given command of two mech units yourself. |

This mission will explain the Join command and discuss basic strategy.
|
Briefing: I think that creep Olaf… I mean CO Olaf is starting to take us seriously. But all of our commanders are caught up in other campaigns. So there’s no one available to lead the Orange Star Army against him. Advisor, it looks like it’s up to you to defend Orange Star. Let me brief you on the current mission. Our troops en route to the Lost Fortress have been waylaid by CO Olaf. It’s up to you to join up with them, beat back Olaf and secure the area. We need the Lost Fortress! Move out! |
This mission focuses on the Supply, Load, and Drop commands.
|
Briefing: My superiors in Orange Star are pleased with your word, Advisor. I’m also happy to say the enemy troops aren’t deployed ahead of us. Look at this! An artillery unit has been assigned to your command! Used correctly, this unit will strengthen your battalion. No doubt about it. But, it sounds like it’s seen a lot of action on the front lines, and… Well, I guess we’ll get a look at it when we reach the battlefield. Oh, and I’ve received one more bit of information. You’ve also been given an APC unit to use. This one is fresh from the factory, so don’t worry about its condition. OK! Let’s get moving! |
This is a chance to show me what you’ve learned. Are you ready?
|
Briefing: An entire company doing recon in the Coral Lagoon area has been lost. The Coral Fortress is surrounded by mountains, so it’s hard to imagine that there are many enemy units there. Still, an entire company it’s gone, so… The point is, we can’t afford to lose that territory. Time to get going! |

 |
Briefing: It appears that we have a problem. Orange Star has hit a snag in its Md Tank development program. On the other hand, Blue Moon seems to have more than enough tanks… I think it’s safe to assume they have mass production capabilities. I pulled some strings and had some B copters and T copters sent down from the frontlines, but that doesn’t give you all that much firepower. Nevertheless, let’s make good use of them. I’ll give you more details once we reach the staging area. Let’s move out! |
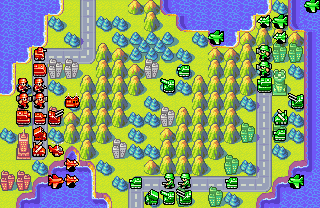
Mission 8 – Air Assault
This mission deals with air units, fuel consumption and anti-air defenses.
| Briefing: Good news! Orange Star’s Md Tank development team has succeeded! Plus, you’ve also been given some new and improved anti-airs! Now, let’s discuss the current operation, Advisor. An entire company has disappeared on its way to the front lines. It was made up mostly of Md tanks and tanks, so this is serious. It may mean that they ran into an air squadron complete with bom… No, that’s not possi… Forget it. It’s nothing. I’m sure I’m just reading too much into the situation. Well, time to get moving! |
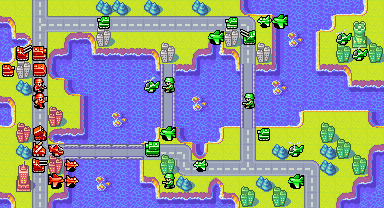
Mission 9 – Air Defense
Rockets and missiles are included in this briefing on indirect combat units.
| Briefing: My superiors have really been dropping the ball lately. The enemy already has fighters and bombers, but it appears that we don’t. But, I did arrange to have some experimental missiles assigned to you. And I also got you some rockets. With all you’ve done, Advisor, it’s the least they could do! It seems that the enemy always has superior units deployed. I apologize. Anyway, it’s time to move out! |
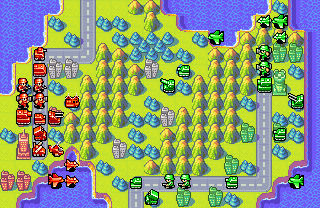
Mission 10 – Dogfights
I wonder how fast you can clear this air and indirect combat unit section?
| Briefing: Hey! More good news! We’ve finally got bombers and fighters ready to go! Three units each! You’ve only got them for this mission, but… It seems Olaf’s troops have appeared on the far shore. Your job is to get over there and take them out in one fell swoop! Let’s get moving! |
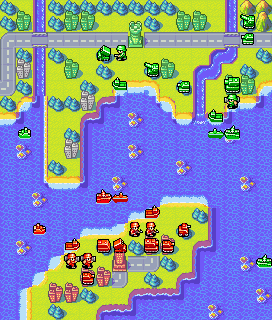
Mission 11 – Naval Forces
Naval units are the topic of this briefing.
| Briefing: You’ve got a tough mission on your hands this time. There are two units that require aid or they’ll be destroyed. One of these is a T copter, which we’ve discussed before. The other is a lander unit. This is a naval unit you haven’t seen yet. You need to protect these units and secure the land on the far shore. This is the mission that’s been entrusted to you, Advisor. Unfortunately, I was unable to get any bombers or fighters this time. But I did arrange for other units I think will be necessary to our success. I’ll explain about these other naval units once we arrive. Time to get moving! |
Mission 12 – Climate Status
This mission focuses on climate and CO Powers.
| Briefing: Before we move out, I need to brief you in detail on CO Olaf. Olaf used to be a CO in the Orange Star Army. In fact, he was my superior. His strong character and skill with the troops make him an invaluable CO. This is what brought him to Blue Moon’s attention. Not only did he switch allegiances, but then he attacked Orange Star… He’s a complete wretch! Just a little more, and the Blue Moon Army will be forced to retreat! Let’s go get ’em! |

Mission 13 – Fog of War
Fog of War is the topic of this briefing.
| Briefing: Finally, we’ve arrived. |
.png) | .png) |
Mission 14 – Special Intel
What a surprise! Are you here for my Special Intel briefing?
| Briefing: This lesson is for commanders who want a little extra knowledge. This is special intel that may just give you the edge in combat. Let’s get started! |
.png) | .png) |
| Cost – 20000 | |||||||
 |
 |
 |
 |
||||
 |
 |
 |
 |
||||
| Fighter units can engage other air units. Their movement range is the highest of all units. Continue reading | |||||||
As a first release, Advance Wars was a very polished game. However, it has a handful of glitches, one of which is infamous and rather disastrous. Continue reading