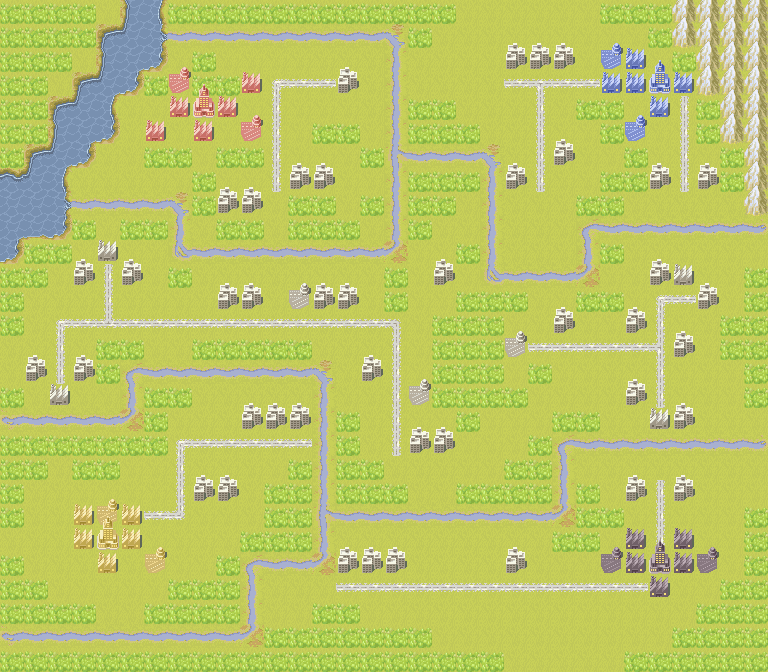
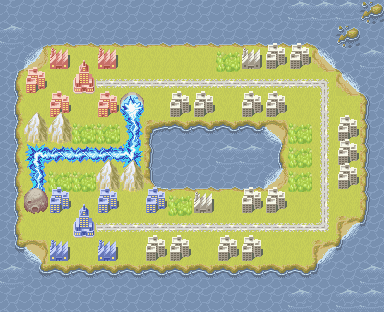
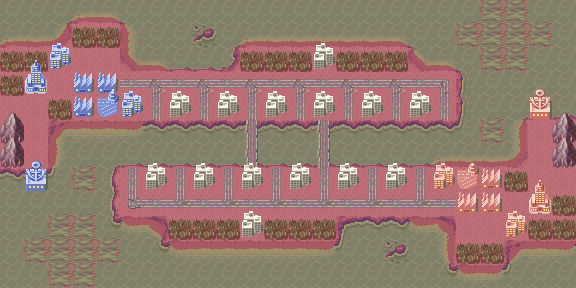
Advance Wars: Days of Ruin/Dark Conflict
Advance Wars: Days of Ruin/Dark Conflict related content.
Advance Wars 4 (AwDoR) Balance Patch by Gippy
Base Game: Advance Wars: Days of Ruin (U)
Release Date: 3rd May 2020
Version 1.1: Download (XDELTA Format)
Short Description: This patch does 3 things:
- Balance the COs. As well, all English information screens are re-worded to reflect the stat changes.
- Adds a turn timer of approximately 5 minutes. (The exact timer is 4:58.65 due to coding quirkiness.) This should be plenty of time for remote desktop play.
- Cracks Nintendo’s SSL authentication protection, allowing the game to connect to altwfc servers. Note that there still isn’t an emulator that can reliably do wi-fi play for everyone, thus this is currently only good for those with DS flashcarts.
Basic Information

Game Platform:
- Nintendo DS
Release Dates:
- North America: 21st January 2008
- Europe: 25th January 2008
Digital Re-release Dates:
DSiWare:
- Japan: 30th October 2013 (Club Nintendo Reward)
Other Information:
- Players: 1 to 4
- Game Mode: Single Player, Single-System Multiplayer, Multi-Cartridge Multiplayer, Nintendo Wifi Connection (Ceased: 20th May 2014)
- DSiWare Game Mode: Single Player, Single-System Multiplayer, Multi-Cartridge Multiplayer
Brenner
| Army: 12th Battalion |  |
| Captain of the 12th Battalion. He has an unshakable faith in humanity’s goodness, and will aid any in need. | |
| “The survivors need our help.” | |
| Unlock: Starts unlocked |
| CO Zone Units: All Units | |
| CO Zone: 3 – 4 – 5 | |
| Attack Boost: +10% | |
| Defence Boost: +30% | |
| Heals all of Brenner’s units by 3 HP, up to their maximum health. | |
| Effect on CO Power Activation: • All units are repaired by 3 HP, including units inside transports | |
C01: Days of Ruin

Map Strategy
Maximum Score: 362 pts
150-pt. time limit: 2 days
100-pt. time limit: 4 days
Player CO: Brenner
Enemy CO(s): The Beast
Special Condition(s): None
Overview: This mission introduces you to the basics of movement and combat.
You can access the tutorial anytime by entering the menu and
selecting Tutorials. Obtaining the perfect score on this map
requires a tremendous amount of luck because it relies on The Beast
making an attack that is very counter-intuitive to the normal
player. Personally, I’ve never seen it happen, but a lot of people
have verified the strategy, which is why it makes the guide.
Day 1:
– Move Bike 2E.
Day 2:
– Move Recon 1N 1E.
– Move Tank 1N 5E.
The Beast Day 2:
– His Infantry must attack your Tank.
– His Recon must attack your Recon.
Day 3:
– Move Tank 2S 2W and destroy enemy Recon from the east.
– Move Recon 1N 1E.
The Beast Day 3:
– His Bike must attack your Recon.
Day 4:
– Destroy enemy Bike with Tank from the south.
– Move Recon 1E and destroy enemy Infantry from the east.
C02: A Single Life
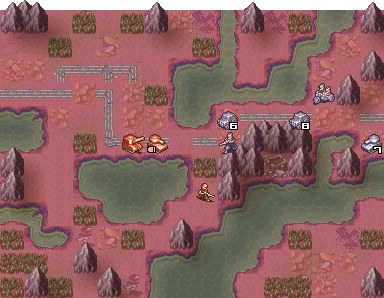
Map Strategy
Maximum Score: 419 pts
150-pt. time limit: 2 days
100-pt. time limit: 5 days
Player CO: Brenner
Enemy CO(s): The Beast
Special Condition(s): None
Overview: This mission introduces you to terrain, Artillery, and the importance
of chokepoints. The perfect score requires a bit of luck to manage,
while the guide below details a straight-forward 400-pt guide.
Fortunately, this guide is one of the few that does not rely on saves
or reloads. However, the perfect score strategy requires that the
Infantry attacks your Tank, which is a rare event.
Day 1:
– Move Infantry 1S 1W.
– Move Tank 1E.
– Move Artillery 1E.
Day 2:
– Destroy enemy Recon with Artillery.
– Move Infantry 1S 1W.
Day 3:
– Destroy enemy Recon with Artillery.
– Move Infantry 1E and attack enemy Infantry from the south.
Day 4:
– Destroy enemy Infantry with Infantry from the south if available.
– Destroy enemy Tank with Artillery.
Day 5:
– Destroy enemy Bike with Artillery.
C03: Freehaven
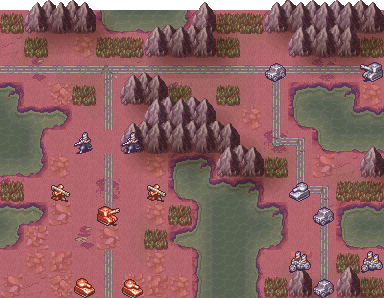
Map Strategy
Maximum Score: 400 pts
150-pt. time limit: 2 days
100-pt. time limit: 5 days
Player CO: Brenner
Enemy CO(s): The Beast
Special Condition(s): None
Overview: This mission reinforces chokepoints in strategy and introduces the
concept of joining units. For the perfect score, we’re going to
take advantage of that concept.
One Tank will score all of the kills, allowing it veteran status.
This gives the unit the firepower needed to increase our power score,
while the Artillery destroys the rest of the units, giving it veteran
status and the power to destroy the last enemy Bike in one hit.
Unfortunately, increasing the power score means we will need saves
and reloads in order to score OHKOs on that 93% match-up.
Day 1:
– Move western Mech 2N and attack enemy Infantry from the west.
– Move western Tank 5N and destroy enemy Infantry from the south.
– Move remaining Mech 2N.
– Move remaining Tank 5N 1W.
– Move Artillery 4N 1E.
The Beast Day 1:
– He must attack your western Mech with his Infantry.
Day 2:
– Move eastern Tank 1W 3N and attack enemy Recon from the west.
– Destroy enemy Recon with Artillery.
– Destroy enemy Infantry with Tank from the south.
– Move western Mech 2E.
– Move remaining Mech 1N.
Day 3:
– Save here.
– Move southern Tank 1E 3N and DESTROY enemy Recon from the south. Reload if
this does not happen.
– Move remaining Tank 2N 2E and attack enemy Tank from the north.
– Destroy enemy Tank with Artillery.
– Move eastern Mech 1N 1E and attack enemy Artillery from the south.
– Move remaining Mech 1E.
Day 4:
– Destroy enemy Artillery with Artillery.
– Move eastern Mech 2W.
– Move remaining Mech 2N and join with wounded Mech.
– Move southern Tank 3E and destroy enemy Recon from the west.
Day 5:
– Destroy enemy eastern Bike with Artillery.
– Destroy enemy Bike with veteran Tank.
C04: Moving On
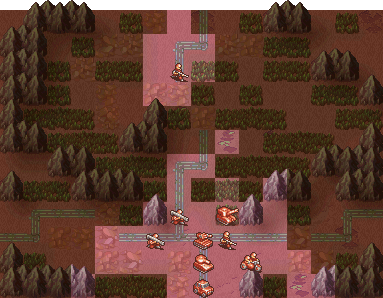
No Fog of War
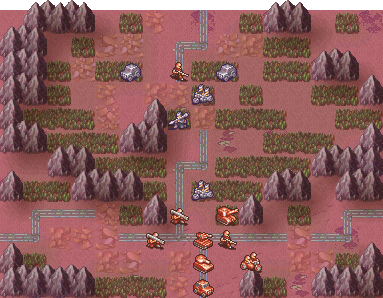
Map Strategy
Maximum Score: 378 pts
150-pt. time limit: 1 day
100-pt. time limit: 3 days
Player CO: Lin
Enemy CO(s): The Beast
Special Condition(s): Fog of War
Overview: This mission introduces you to the Flare and Fog of War. The most difficult aspect of the perfect score is getting Team Bravo to survive Day 1. In order for this to happen, the Infantry must have 7 HP and must keep a good portion of that 7 HP intact. Again, if you have animations on, it makes it easier to keep track of things.
Day 1:
– Fire Flare 4N of its position.
– Move eastern Mech 1E.
– Move remaining Mech 1N 1E.
– Move Recon 5N.
– Move southern Infantry 3N.
– Save.
– Move northern Infantry 1S and attack enemy Mech from the north. In order to have the best chance of earning the maximum score, your Infantry must have 7 HP.
– Move Tank 1W 5N and destroy enemy Mech from the south.
The Beast Day 1:
– Your northern Infantry must not die in order to have perfect technique.
– His Recon must attack your Recon.
– His northern Bike must attack your Infantry.
– His remaining Bike must attack your Mech that is on road.
Day 2:
– If the above happened, save here.
– Move Tank 3N 1W and attack enemy Recon from the north. Enemy Recon must have 3 HP left.
– Move Recon 2E.
– Destroy northern enemy Bike with Artillery.
– Destroy enemy Recon with Mech.
– Destroy remaining enemy Bike with Flare.
– Move wounded Mech 2N.
The Beast Day 2:
– Enemy Recon must suicide on wounded Mech. Good game.
Strategy by Graphyte Ronin and ALAKTORN. Map image by Tsuruya.
C05: New Allies
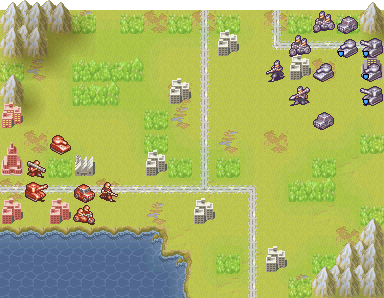
Map Strategy
Maximum Score: 426 pts
150-pt. time limit: 6 days
100-pt. time limit: 12 days
Player CO: Brenner
Enemy CO(s): The Beast
Special Condition(s): None
Overview: For the veterans of the Advance Wars series, the suicide speed strategy makes its triumphant return. Rush the enemy HQ with the Bike while a Tank, Artillery, Recon, and Infantry are sacrificed for The Beast’s forces. The Mech must survive for the maximum score possible, which means it runs to the northwest corner.
The maximum score requires an insane amount of luck because The Beast must follow a specific sequence on day 2 in order to set up the power score.
If the reloads are getting to you, just destroy the northern Recon on day 2 to earn the S-rank. It’s considerably easier than getting the perfect storm of movement to happen on The Beast’s turn.
By allowing the Infantry to survive along with the Mech, the technique score can be increased to 126 pts. However, this requires that the Infantry survives along with the Mech. By keeping those two units as far from the action along with the use of defensive cover, you can buy enough time for your Bike to sneak in and finish the job.
Unfortunately, this does not change the amount of luck needed to make this guide work. On the other hand, you have a new score to show for your accomplishments.
Day 1:
– Move Infantry 2W 1S.
– Move Mech 1W.
– Move Bike 5E.
– Move Recon 2E 3N.
– Move Tank 4E 2N.
– Move Artillery 3E 2N.
The Beast Day 1:
– His northern Recon must move 1W of the northern neutral city.
– His remaining Recon must move 3S of the northern neutral city.
Day 2:
– If the above happens, save here.
– Move Infantry 2W.
– Move Bike 5E.
– Move Recon 3E 2N.
– Move Tank 2E.
– Move Artillery 2N 3E.
The Beast Day 2:
– First, The Beast must destroy your Artillery with two Tanks.
– Second, The Beast must attack your Infantry with his southern Recon.
– Third, The Beast must attack your Recon with his remaining Recon.
– Finally, The Beast must destroy your Recon with his remaining Tank.
Day 3:
– Move Bike 1E 2N.
– Move Tank 3S 1E.
The Beast Day 3:
– Three enemy Tanks must attack and destroy your Tank.
– Wounded enemy Recon must move towards your Infantry and Mech.
Day 4:
– Move Infantry 3N.
– Move Bike 4N 1E and begin capturing The Beast’s HQ.
Day 5:
– Destroy wounded Recon with Mech.
– Finish capturing The Beast’s HQ.
C07: A Kind of Home
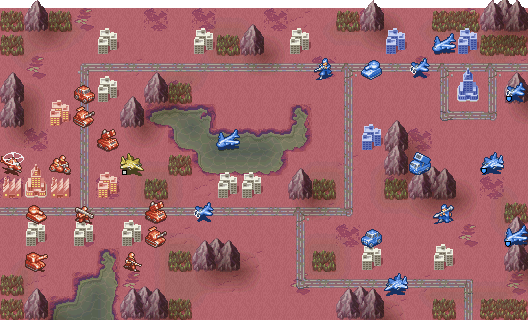
Map Strategy
Maximum Score: 399 pts
150-pt. time limit: 8 days
100-pt. time limit: 16 days
Player CO: Brenner
Allied CO: Waylon
Enemy CO(s): Tasha
Special Condition(s): None
Overview: For the record, Waylon serves one purpose: bait. On that note, a lot of baiting is needed to lure Tasha’s units to her demise.
Completing this map unlocks Trial Map 36.
Day 1:
– Destroy enemy Bomber with southern Missiles.
– Move Mech 2E.
– Move Artillery 1N 4E.
– Move Infantry 1N 2E.
– Move Bike 4N 1E.
– Move northern Anti-Air 2N 4E.
– Move northern Missiles 3N 1E.
– Move Recon 5E.
– Move Tank 2E 4N.
– Move B-copter 3E 3N.
Day 2:
– Destroy enemy Fighter with southern Missiles.
– Move southern Anti-Air 2N and destroy Duster.
– Move Mech 2E.
– Move Artillery 3E.
– Move Infantry 2N 1E.
– Move Bike 5E.
– Move B-copter 6E.
– Move Recon 4E.
– Move northern Anti-Air 1N 1E.
– Move northern Missiles 2E 1S.
– Move Tank 2N 4E.
– Save here.
Tasha Day 2:
– Your Anti-Air must have 4 HP left after being attacked by her Tank.
– Your Recon must have 9 HP left after being attacked by her Duster.
Day 3:
– If the above happens, save here.
– Destroy enemy Bomber with southern Missiles.
– Move Artillery 4W 1N.
– Move Mech 1S 1E and attack enemy Recon from the west.
– Move southern Anti-Air 4E 2S and destroy enemy Recon from the east.
– Destroy enemy Duster with northern Missiles.
– Move Recon 1N.
– Move Bike 4E 1S.
– Move northern Anti-Air 2S 3E.
– Move B-copter 1E 2N and attack enemy Tank from the east.
– Move Tank 2E and destroy enemy Tank from the south.
Day 4:
– Move southern Anti-Air 5E 1S and destroy enemy Mech from the west.
– Move southern Missiles 4E 1N.
– Move Artillery 1N.
– Move Tank 5E 1S and destroy enemy Infantry from the east.
– Move northern Anti-Air 3E 3S.
– Move Recon 7E 1N.
– Move northern Missiles 1N 4E.
– Move B-copter 3E 3S.
– Save here.
Tasha Day 4:
– Your B-copter will be destroyed by her Duster and Fighter.
– Your Recon must survive.
– Your southern Anti-Air must have 4 HP left after being attacked by her Bomber.
Day 5:
– If the above happens, save here.
– Destroy Duster with northern Missiles.
– Destroy Fighter with southern Missiles.
– Move Tank 6E and destroy Rockets from the north. Reload if this does not happen.
– Attack enemy Bomber with southern Anti-Air. Her Bomber must have 3 HP left.
– Destroy enemy Bomber with northern Anti-Air.
C08: A New Threat
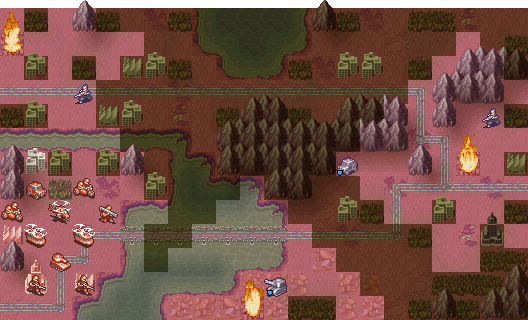
No Fog of War

Map Strategy
Maximum Score: 429 pts
150-pt. time limit: 5 days
100-pt. time limit: 10 days
Player CO: Lin
Enemy CO(s): The Beast
Special Condition(s): Fog of War
Overview: Using every unit at your disposal, goad The Beast into building more units in the north while you distract and sneak a loaded T-copter for the capture. You also want to turn Battle Animations on due to a certain step in this guide, which does rely on luck.
For those who want the faster guide which scores 9 pts less than this one and relies on less luck, check below.
7-day Strategy, 429 pts:
Day 1:
– Move Mech 2N and begin capturing neutral city.
– Move Tank 1N 5E.
– Move western Bike 1S 4E.
– Move remaining Bike 2S 2E.
– Load western Infantry into T-copter, move T-copter 1E 5N, and drop Infantry west.
– Load remaining Infantry into T-copter and move T-copter 2N 4E.
– Move B-copter 2N 4E.
– Move Recon 2S 2E.
Day 2:
– Finish capturing neutral city.
– Move B-copter 5E.
– Move eastern T-copter 2N 4E.
– Move western T-copter 2S.
– Move Infantry 3E and begin capturing neutral factory.
– Move Recon 5E.
Day 3:
– Finish capturing neutral factory.
– Move Recon 3W.
– Move Tank 1E and destroy Recon from the west.
– Move western Bike 5E.
– Load Mech into western T-copter, move T-copter 1W 2N, and drop Mech west.
– Move eastern T-copter 6E.
– Move B-copter 1S 4E.
– Save here.
The Beast Day 3:
– Enemy Recon must attack your Bike and must take close to 1 HP or 1 HP of counterattack damage.
– Enemy Mech must attack your B-copter for 1 HP of damage.
Day 4:
– Move western Bike 5W.
– Move Tank 1E and destroy enemy Recon from the west.
– Save here.
– Move Recon 2E.
– Move remaining Bike 2E.
– Move Infantry 1W 2N.
– Load Mech into T-copter, move T-copter 3N, and drop Mech north.
– Move eastern T-copter 5S 1E and drop Infantry south.
– Move B-copter 2N 2E and attack enemy Tank from the west.
The Beast Day 4:
– Enemy Flare must not attack your B-copter.
Day 5:
– Move northern Infantry 2W and begin capturing enemy city.
– Load Mech into western T-copter, move T-copter 2S 2E, and drop Mech north.
– Move Recon 8E.
– Move Tank 5E and destroy enemy Mech from the south.
– Move eastern Bike 5E.
– Move remaining Bike 5E.
– Move B-copter 2E 2S.
– Move T-copter 3E 2S.
– Move eastern Infantry 2E.
– Save here.
The Beast Day 5:
– Enemy Flare must attack B-copter from the east.
– Enemy Flare must OH NO! into Mech.
Day 6:
– Save here.
– Finish capturing enemy city.
– Load Mech into T-copter, move T-copter 3E 1N, and drop Mech east.
– Move Recon 1S 3E.
– Move B-copter 1S 1E.
– Move T-copter 4N.
– Move Tank 5E and destroy enemy Tank from the west.
– Move eastern Bike 1S 3E.
– Move remaining Bike 3E 1N.
– Move Infantry 2N and begin capturing The Beast’s HQ.
Day 7:
– Destroy enemy Flare with Tank.
– Finish capturing The Beast’s HQ.
6-day Strategy, 420 pts:
Day 1:
– Load western Infantry into T-copter, move T-copter 5N 1E, and drop Infantry west.
– Load eastern Infantry into T-copter and move T-copter 4N 2E.
– Move B-copter 2N 4E.
– Move Recon 2S 3E.
– Move Tank 1N 5E.
– Move Mech 1S 1E.
Day 2:
– Move Recon 5E.
– Move Tank 1E.
– Move Mech 2E.
– Move Infantry 3E and begin capturing neutral factory.
– Move loaded T-copter 5E.
– Move B-copter 5E 1N.
– Move remaining T-copter 6E.
Day 3:
– Finish capturing neutral factory.
– Move Recon 3W.
– Move Mech 2E and destroy enemy Recon from the west.
– Move loaded T-copter 6E.
– Move B-copter 5E 1S.
– Move unloaded T-copter 6E.
Day 4:
– Move western Infantry 2N 1W.
– Move B-copter 2E 1N.
– Move Mech 2W.
– Move Tank 1E and destroy enemy Recon from the west.
– Move Recon 8E.
– Move loaded T-copter 4S and drop Infantry east.
– Move remaining T-copter 3S 2E.
Day 5:
– Move eastern Infantry 3E and begin capturing The Beast’s HQ.
– Move Recon 3E.
– Move northern T-copter 2S 3E.
– Move remaining T-copter 5E.
– Move B-copter 2E 3S.
Day 6:
– Finish capturing The Beast’s HQ.
C09: The Beast
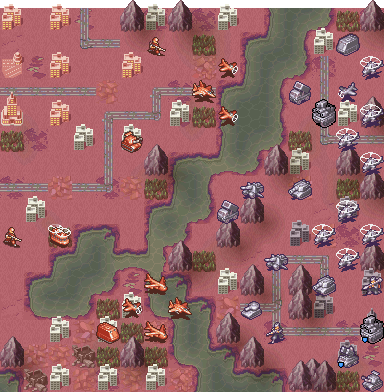
Map Strategy
Maximum Score: 416 pts
150-pt. time limit: 3 days
100-pt. time limit: 6 days
Player CO: Brenner
Enemy CO(s): The Beast
Special Condition(s): None
Overview: Escort a loaded T-copter with two Fighters, two Bombers, and a Duster to The Beast’s HQ while hoping for favorable AI movement on his part. You do not want The Beast to block your path to his HQ with his ground units, which will force a reset.
Day 1:
– Move northern Infantry 1N.
– Move northernmost Duster 2W 2N.
– Move northern Duster 4W 4N.
– Move Anti-Air 1E 4N.
– Move northern Fighter 5E and attack enemy Duster from the west.
– Load Infantry into T-Copter.
– Move northern Bomber 1N 4E and attack enemy Anti-Tank from the west.
– Move southern Bomber 3E 1N and destroy enemy Tank from the west.
– Move Fighter 3N 5E and destroy enemy B-copter from the west.
– Move southern Duster 1E.
– Move T-copter 3S 3E.
Day 2:
– Move T-copter 3S 3E.
– Move southern Duster 3S 3E.
– Move northern Fighter 8S 1W and destroy enemy B-copter from the north.
– Move remaining Fighter 1S 1W and destroy enemy B-copter from the east.
– Move unpromoted Bomber 4E 3S and attack enemy Missiles from the north.
– Move promoted Bomber 2N 4E and attack enemy Anti-Air from the north. It must not take any damage in the counterattack.
The Beast Day 2:
– Your Bomber must have 6 HP left after being attacked by his Missiles.
Day 3:
– Destroy enemy Missiles from the north with unpromoted Bomber.
– Move promoted Bomber 4S 1E and destroy enemy Anti-Tank from the west.
– Move southernmost Duster 1N 6E.
– Move T-copter 5E 1N and drop Infantry north.
– Move northern Fighter 4S 2W and destroy enemy B-copter.
– Move remaining Fighter 1S 1E.
– Move Anti-Air 2E and destroy enemy B-copter from the south.
Day 4:
– Move Anti-Air 1E and destroy enemy B-copter from the south.
– Both Bombers must attack and destroy enemy War Tank from the west and north.
– Move Infantry 2E and begin capturing The Beast’s HQ.
– Move T-copter 6W.
Day 5:
– Finish capturing The Beast’s HQ.
C10: Almost Home
Map Strategy
Maximum Score: 432 pts
150-pt. time limit: 7 days
100-pt. time limit: 14 days
Player CO: Will
Enemy CO(s): The Beast
Special Condition(s): None
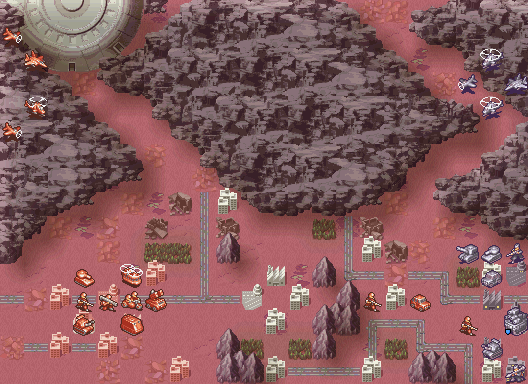
Overview: Placement of your pre-deployed units is key to finishing this map with the highest score possible. The enemy War Tank is neutralized by surrounding it with your two Dusters. The power score is provided by a number of units, with the Anti-Air as the main source. Note that you cannot save the easternmost Infantry, but it serves its purpose as a distraction.
On Day 5, the enemy Anti-Air does not like to cooperate in its movement. The guide assumes the best possible situation, but you will have to make do if you cannot attack that unit from the preferred position. Use the save on Day 4 to experiment with your own movement. Note that it is still possible to finish in 7 days even if the worst case scenario happens.
Day 1:
– Move easternmost Infantry 1N 1E and begin capturing enemy factory.
– Move Recon 2N 4W.
– Move easternmost Infantry 2W.
– Move Bike 5E and begin capturing neutral airport.
– Load Mech into T-copter, move T-copter 5E, and drop Mech east.
– Load Infantry into Rig, move Rig 5E, and drop Infantry east.
– Move Missiles 2E 3N.
– Move Tank 6E.
– Move Anti-Air 6E.
– Move Fighter 1S 8E.
– Move northern Duster 2S 6E.
– Move remaining Duster 8E.
– Move B-copter 4E 2S.
Day 2:
– Finish capturing neutral airport.
– Move easternmost Infantry 1W and begin capturing neutral city.
– Begin capturing neutral factory with Mech.
– Begin capturing neutral city with Infantry.
– Move Rig 2E 3N.
– Move Recon 1W 1S.
– Move Tank 2E 1N.
– Move Anti-Air 2E 1N.
– Move Missiles 2E.
– Move B-copter 4E 2S.
– Move northern Duster 4E 4S.
– Move remaining Duster 4E 4S.
– Move T-copter 3N 1E.
– Move Fighter 5S 4E.
Day 3:
– Finish capturing neutral properties.
– Move Bike 2E 3S.
– Move Tank 1N 2E and attack enemy Anti-Air from the north.
– Move Rig 1W.
– Move Anti-Air 2N 1E and destroy enemy Anti-Air from the west.
– Move T-copter 4S 2E.
– Move B-copter 2S 4E.
– Move northern Duster 2S 6E.
– Move remaining Duster 1S 3E.
– Move Fighter 4S 1E.
– Move Missiles 2E.
– Save here.
The Beast Day 3:
– His Fighter must attack one of your Dusters.
Day 4:
– Move Bike 1W and begin capturing neutral city.
– Destroy enemy Fighter with Missiles.
– Move Fighter 4N 2E.
– Move Anti-Air 5E and destroy enemy Infantry.
– Load Mech into Rig, move Rig 5E, and drop Mech south.
– Move wounded Duster 2S of Anti-Air.
– Move remaining Duster 1S of Anti-Air.
– Load western Infantry into T-copter and move T-copter 2S 2E.
– Move remaining Infantry 2E.
– Move Recon 1N 3E.
– Save here.
– Move B-copter 3S 2E and attack enemy Tank from the south.
– Move Tank 2E 2S and destroy enemy Tank from the north.
The Beast Day 4:
– His Recon must attack your B-copter.
– He must build an Anti-Air in his northern factory.
Day 5:
– Move Bike 1E 3N.
– Move Tank 1S 4E and attack enemy Anti-Air from the west.
– Move Anti-Air 3E 1S and destroy Anti-Air from the north.
– Move northern Duster 4E 3S.
– Move remaining Duster 3S 3E.
– Move Fighter 1W 2N.
– Move B-copter 1E 1S and destroy Recon from the south.
– Move Recon 1S 2E.
– Move Rig 2E 2S.
– Move Mech 1N 1W and begin capturing neutral city.
– Move T-copter 1N 5E and drop Infantry east.
– Move Missiles 1E 1S.
The Beast Day 5:
– His Infantry may attack your B-copter. If not, do not attack it the following day.
Day 6:
– Begin capturing The Beast’s HQ.
– Move Recon 2W and destroy enemy Infantry.
– If your B-copter was attacked, move Tank 2S 1W and destroy enemy Infantry.
If not, do not move Tank.
– Move T-copter 1N 1E.
– Move Anti-Air 2S and destroy enemy Mech.
– Move B-copter 3W.
– Move Mech 1N 1W.
– Move Bike 2N 3E and begin capturing neutral city.
– Move Missiles 2E 2S.
– Move Rig 2W.
– Move Fighter 1E 1N.
Day 7:
– Destroy enemy Infantry with Anti-Air.
– Destroy enemy B-copter with Fighter.
– Finish capturing The Beast’s HQ.
Strategy by aznweirdo718. Map image by Tsuruya.
C11: A Storm Brews
Map Strategy
Maximum Score: 406 pts
150-pt. time limit: 4 days
100-pt. time limit: 9 days
Player CO: Lin
Allied CO: Davis
Enemy CO(s): Tasha
Special Condition(s): None
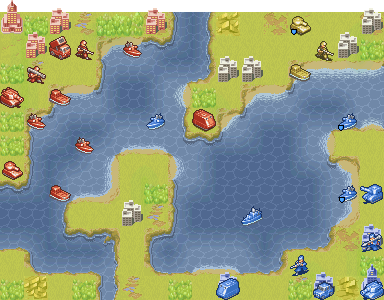
Overview: Send a loaded Gunboat to Tasha’s HQ while using your predeployed forces to distract Tasha. The Rockets and Md. Tank will provide most of the power score. Davis’ forces are to serve as a distraction. If he attacks at all, it will lower your power score.
Like many of the maximum score walkthroughs, a bit of luck is needed.
Completing this map unlocks Trial Map 24.
Day 1:
– Load Md. Tank and Rockets into Lander, move Lander 3E 2S, and drop Md. Tank
east and Rockets south.
– Load Mech into Gunboat, move Gunboat 2S 3E, and drop Mech south.
– Move remaining Lander 2N 2E.
– Move western Gunboat 2N 3E.
– Load Infantry into Gunboat and move Gunboat 2E 2S.
Tasha Day 1:
– Her APC must begin building the temporary port 1N 1W of her westernmost city.
Day 2:
– Move Mech 1S 1E and begin capturing neutral city.
– Attack enemy Cruiser with Rockets.
– Move westernmost Gunboat 4E 1S.
– Move western Lander 3E 1S.
– Load Md. Tank into Lander, move Lander 4E 1N, and drop Md. Tank north.
– Move western Gunboat 2S 3E.
– Move loaded Gunboat 3S 2E.
Tasha Day 2:
– Her Mech must have been dropped 1W of Davis’ Lander.
Day 3:
– Save here.
– Finish capturing neutral city.
– Destroy enemy Cruiser with Rockets.
– Move Md. Tank 1W.
– Move northern lander 5S.
– Move remaining Lander 3S 1E.
– Move westernmost Gunboat 2S 2E.
– Move northernmost Gunboat 3S.
– Move loaded Gunboat 5E 2S and drop Infantry south or east.
Tasha Day 3:
– Your eastern Lander must survive the enemy attacks.
Day 4:
– Begin capturing Tasha’s HQ.
– Destroy enemy Mech with Md. Tank.
– Move southernmost Gunboat 2N.
– Move eastern Lander 2N.
– Move remaining Lander 2N 1E and join with wounded Lander.
– Destroy enemy Recon with Rockets.
Day 5:
– Destroy enemy Infantry with Rockets.
– Finish capturing Tasha’s HQ.
Strategy by Translucent Air. Map image by Tsuruya.
C12: History of Hate
Map Strategy
Maximum Score: 388 pts
150-pt. time limit: 3 days
100-pt. time limit: 6 days
Player CO: Will
Allied CO: Waylon
Enemy CO(s): Tasha
Special Condition(s): None
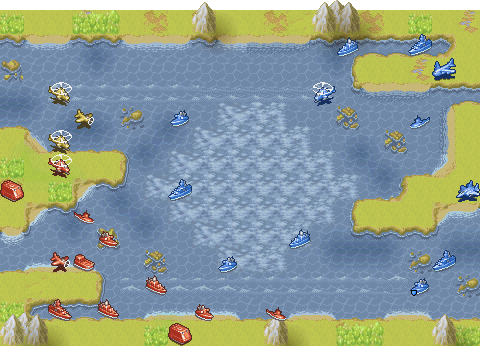
Overview: Every single unit at your disposal is used to lure Tasha’s units for the kill. There are a few attacks done that greatly decrease your power score in exchange for the maximum speed score. Due to terrain, your power score may end up one point lower than the indicated maximum score. Enemy match-ups also vary, which may increase or decrease your power depending on how the battle went.
There is one instance of luck needed where Tasha must attack two certain units of yours, but it’s nothing significant.
Completing this map unlocks Tasha.
Day 1:
– Move B-copter 5E 1N and attack enemy Gunboat.
– Move northern Sub 2N 4E and attack enemy B-ship from the north.
– Move northern Gunboat 3E.
– Move Duster 1N 7E.
– Move Lander 1N 5E.
– Dive remaining Sub 3N 1W.
– Move remaining Gunboat 1N 1E and attack enemy Gunboat from the south. It is
recommended that the enemy is left with 3 HP.
– Move southern Rig 1N 2E and supply Gunboat.
– Move western Cruiser 4N 2E.
– Move remaining Cruiser 3N 2E.
– Move B-ship 3E 2N and destroy enemy Gunboat.
Waylon Day 1:
– His B-copters must destroy Tasha’s Gunboat and B-ship.
Day 2:
– Save here.
– Move western Cruiser 6E and destroy enemy Fighter from the north.
– Move B-copter 5E 1S.
– Dive northern Sub 1N 5E.
– Move Duster 4N 2E.
– Move remaining Cruiser 5E 1N and attack enemy Sub from the south.
– Move western Gunboat 1N 4E and attack enemy Cruiser.
– Move B-ship 3E 2N and destroy enemy Cruiser.
– Move remaining Sub 5E and attack enemy B-ship from the west.
– Move Lander 6E.
– Move remaining Gunboat 5N 2E.
Tasha Day 2:
– Tasha’s northern B-ship must attack your eastern Cruiser without moving.
– Tasha’s Bomber must attack your western Cruiser.
Day 3:
– If the above happens, save here.
– Destroy enemy Bomber with western Cruiser from the west.
– Move remaining Cruiser 1E and destroy enemy Sub from the north.
– Move eastern Sub 2E 1S and destroy enemy Gunboat from the north.
– Move remaining Sub 2N 1E and attack enemy B-ship from the west.
– Move Duster 3E 1S and destroy enemy B-copter from the east.
– Move northern Gunboat 2E and attack enemy Cruiser from the south.
– Destroy enemy Cruiser with B-ship.
Waylon Day 3:
– His B-copters will destroy Tasha’s two B-ships.
C13: Greyfield Strikes

Map Strategy
Maximum Score: 444 pts
150-pt. time limit: 7 days
100-pt. time limit: 14 days
Player CO: Brenner
Allied CO: Greyfield
Enemy CO(s): Gage
Special Condition(s): None
Overview: Your navy and Md. Tank will provide the power score while a loaded Rig will head towards HQ. Greyfield’s orders can screw this guide over, which will utilize many saves in order to provide the maximum possible power score.
There are two possible ways to finish this map depending on Gage’s build order. If he builds a Tank, you will finish one day early because the rest of the guide falls apart on day 7. If he builds a Recon, you can delay the capture by one day and increase your power and technique score.
Completing this map unlocks Gage.
Day 1:
– Build Md. Tank in northern factory.
– Load northern Infantry into northern Gunboat, move Gunboat 4W 2N, and drop
Infantry north.
– Load remaining Infantry into Rig.
– Load Rig into Lander and move Lander 1N 1E.
– Move western Gunboat 3N 4W.
– Move Carrier 1N 4W.
– Move Cruiser 5W.
– Move Sub 1S 5W.
– Save here.
– Move B-ship 2W 3N and destroy enemy Gunboat. Reload if this does not happen.
Day 2:
– Save here.
– Move B-ship 3N 1W and attack Md. Tank. The Md. Tank must have 5 HP left.
Reload if this does not happen.
– Load Md. Tank into Lander and move Lander 6N.
– Move Infantry 2W 1N and begin capturing neutral port.
– Move eastern Gunboat 1N.
– Move Sub 4W 1N and dive.
– Move Carrier 2W 3N.
– Move Cruiser 2W 3N.
– Move western Gunboat 4W 2N.
– Save here.
Gage Day 2:
– His Battleship must attack your Carrier.
– His Md. Tank must attack your B-ship and NOT damage it. If this happens,
reload.
Day 3:
– Greyfield will order one of your units to wait. The following units must be
ordered to wait: Lander, Carrier, or Cruiser. Any other unit will force a
reload.
– If the above happens, save here.
– Move B-ship 2W 1S and destroy Md. Tank.
– Move Lander 3N and drop Md. Tank north and loaded Rig east.
– Finish capturing neutral port.
– Move Cruiser 3W 1S.
– Attack enemy B-ship from the south with western Gunboat.
– Destroy enemy B-ship from the west or north with Sub, depending on the
position of the B-ship.
– Save here.
Gage Day 3:
– Optimally, Gage will build a Recon. If he builds a Tank, the map can still
be completed, but with a lower S-rank.
Day 4:
– Save here.
– Move Md. Tank 1N 2E and attack enemy Missiles from the west. The Missiles
must have 3 HP left. Reload if this does not happen.
– Move Rig 1W 2N and drop Infantry east.
– Load remaining Infantry into Gunboat, move Gunboat 5E 1N, and drop Infantry
north.
– Move B-ship 4W 1S and destroy enemy Cruiser if available.
– Destroy enemy Gunboat from the south with Sub.
– Move western Gunboat 1E of your Sub.
Gage Day 4:
– His Recon/Tank should attack your western Infantry.
– His Anti-Air should approach your remaining Infantry.
– His Seaplane should attack your B-ship.
– His Carrier should approach your Sub.
– His healthy Missiles should move 2E.
Day 5:
– If the above happens, save here.
– Destroy enemy Missiles with your Md. Tank from the west.
– Move eastern Infantry 2E and begin capturing Gage’s HQ.
– Load remaining Infantry into Gunboat, move Gunboat 5S 1W, and drop Infantry
west.
– Load Rig into Lander.
– Move B-ship 1S 2E.
– Destroy enemy Seaplane from the west or south with Cruiser.
– Destroy enemy Carrier from the north with Sub.
– Move western Gunboat 3W 2N.
– Save here.
Gage Day 5:
– His Recon and Anti-Air should retreat to the west. If he built a Tank, he
will attack your Md. Tank
– His Missiles should move 2W.
– His Lander should approach your Sub.
Day 6:
– If the above happens, save here. The guide varies depending on which unit
Gage built earlier.
– If Gage has a Tank, then destroy enemy Lander with Sub and finish capturing
Gage’s HQ.
– If Gage has a Recon, then destroy enemy Missiles from the west with Md. Tank.
If this does not happen, reload.
– Move Lander 2W and drop Rig east.
– Move Cruiser to the tile 3S 3W of Gage’s southern port.
– Destroy Lander with Sub.
Gage Day 6:
– His Anti-Air should attack your Rig.
– His Sub should approach your Sub.
Day 7:
– Move Sub 1N.
– Move Cruiser 3W 3N and destroy enemy Sub.
– Destroy enemy Recon with Md. Tank.
– Finish capturing Gage’s HQ.
C14: A Hero’s Farewell
Map Strategy
Maximum Score: 450 pts
150-pt. time limit: 10 days
100-pt. time limit: 20 days
Player CO: Brenner
Enemy CO(s): Forsythe
Special Condition(s): None
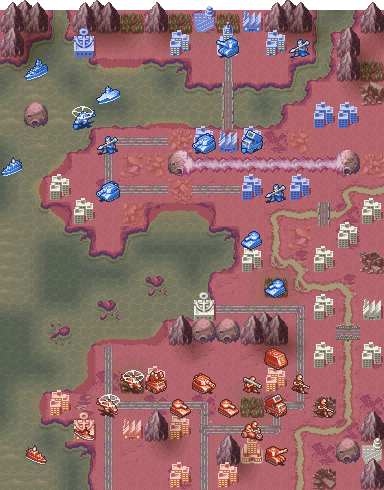
Overview: I salute you, Forsythe. The Tactics Room was the outline for this D2D, which uses every unit at your disposal. They are essential in obtaining the perfect score. Use your B-copters to manipulate Forsythe’s units while you move your units into position before breaking the right meteorite.
Once the plasma clears, destroy the Rockets and move in with all of your units. The Rockets remain behind in order to provide the final attacks needed to provide the power score. Surround the airport and factory with your units, protecting your Infantry in the process.
On the naval front, your Sub is used to wound the B-ship and destroy the Carrier before revealing itself as bait for Forsythe’s B-copter. The Cruiser simply serves as bait for Forsythe’s Cruiser. This part is the most important of the entire guide. If the AI fails to follow this, the capture is doomed to fail.
The most random part is Forsythe’s Cruiser. On Day 4, it may attack your Cruiser, which dooms the guide. Its behavior seems to guide the actions of Forsythe’s Seaplane. If his Cruiser ignores yours while your Cruiser is being repaired, his Seaplane may attack your Bike, allowing you to greet it with explosives to the face.
As long as your Missiles destroys either the T-copter or Seaplane, you will earn 150 points in the power score assuming all else goes according to plan. If you destroy both, the movement regarding the Mech, southern B-copter, southern Infantry, and Rockets can be ignored and they can simply retreat instead.
As a side note, since this D2D finishes in 9 days, you will fail to see the conversation between Forsythe and Brenner on Day 10. If you want to see it, save on Day 9, end your turn, and watch the dialogue. Then you can reload your save and finish the map.
Completing this map unlocks Forsythe.
Day 1:
– Move eastern Infantry 2E.
– Move remaining Infantry 2N 1E.
– Load Mech into Rig, move Rig 1E 2N, and drop Mech east.
– Move eastern Tank 3E 3N.
– Move remaining Tank 1N 5E.
– Move Md Tank 4E 1N.
– Move Rockets 2N 2E.
– Move Artillery 3N 2E.
– Move eastern B-copter 1N 5E.
– Move remaining B-copter 2N 4E.
– Move Bike 1E 3N.
– Move Missiles 3E 2S.
– Move Sub 3W 3N and dive.
Day 2:
– Save here.
– Move southern Infantry 2S and begin capturing neutral airport.
– Move remaining Infantry 2E 1N and begin capturing neutral factory.
– Move Rig 3S 1W.
– Move Mech 2N and begin capturing neutral city.
– Move Bike 2E 2N and begin capturing neutral city.
– Attack enemy Tank with Rockets.
– Move Md Tank 2N and destroy enemy Tank from the east.
– Move northern Tank 3E 3N.
– Move remaining Tank 2N 2E.
– Move Artillery 2N 2E.
– Move Missiles 3E 2N.
– Move western B-copter 3E 3N.
– Move remaining B-copter 2E 4N.
– Move Sub 4N.
– Move Cruiser 1W 1N.
Forsythe Day 2:
– He should build a Seaplane in his Carrier.
Day 3:
– Save here.
– Finish capturing neutral properties.
– Move southern B-copter 1N and attack enemy Mech from the east.
– Destroy enemy Mech with Md Tank from the south.
– Move remaining B-copter 3N 2E and attack Meteor.
– Move northern Tank 2W 2N.
– Move southern Tank 3N.
– Move Artillery 4N 1W.
– Move Rockets 1N 2E.
– Move Missiles 3N.
– Move Sub 1N and attack enemy B-ship from the west.
– Move Cruiser 3E.
Day 4:
– Save here.
– Move Mech 1W 1N.
– Move Bike 5W and begin capturing neutral port.
– Attack Meteor with northern B-copter from the south.
– Attack Meteor with Artillery.
– Move remaining B-copter 3N 1W.
– Move southern Tank 1W 1N.
– Move northern Infantry 2N 1W.
– Move southern Infantry 2N.
– Move Rockets 3N.
– Move Rig 2N 4E.
– Move Sub 4N 1E.
– Move Cruiser 2S 2W.
Forsythe Day 4:
– Forsythe must build a Mech in his southern factory and a Seaplane in his
Carrier.
– Forsythe must not attack your Cruiser.
Day 5:
– Finish capturing neutral port.
– Move Sub 1E and destroy enemy Carrier from the west.
– Move Cruiser 2E 2N.
– Destroy Meteor with eastern B-copter from the south.
– Move southern Tank 4N 2W and attack enemy Rockets from the east.
– Move Md Tank 5N and destroy enemy Rockets from the south.
– Move remaining B-copter 2N.
– Move remaining Tank 2N 2W.
– Move Mech 2N and begin capturing enemy city.
– Move northern Infantry 1N 2W.
– Move Artillery 2W 3N.
– Move Rockets 1N 2W.
– Load southern Infantry into Rig and move Rig 3N 2W.
Forsythe Day 5:
– Forsythe must not attack your Cruiser.
– Forsythe may attack your Bike with his Seaplane.
– Forsythe must attack your western B-copter with his Mech. Enemy Mech must
have 6 HP or less afterwards.
– Forsythe must not attack your eastern B-copter with his Mech.
– Forsythe must build Rockets in his northern factory.
Day 6:
– If the above happens, save here.
– Destroy enemy Seaplane or T-copter, if available, with Missiles. Give
priority to the T-copter. If unavailable, leave it alone.
– Move northern B-copter 1E 4S.
– Move eastern B-copter 4W 2N and destroy enemy Mech from the east. Reload
if this does not happen.
– Move Md Tank 1W 1N and destroy enemy Infantry from the south.
– Move southern Tank 2W 4N.
– Move remaining Tank 2W 4N.
– Finish capturing enemy city.
– Move Bike 5E.
– Move loaded Rig 4N 2W.
– Move Artillery 1W 1N.
– Move Sub 2N 1W and surface.
– Move Cruiser 3W 3N.
Forsythe Day 6:
– Forsythe must build Duster in his airport.
Day 7:
– Save here.
– Destroy enemy T-copter, if available, with Missiles. If enemy Seaplane
attacked Missiles, retreat Missiles 3S 1W.
– Destroy enemy Infantry with Rockets.
– Move southern Tank 2N.
– Move remaining Tank 2W 1N.
– Move Md Tank 4N 1W.
– Move northern B-copter 4N.
– Move Rig 2W 4N and drop Infantry north.
– Move Sub 2E.
– Move Artillery 2W 2N.
– Move Bike 2E.
– Move Cruiser 3S 3E.
– Move Mech 1S 1E.
– Move Infantry 1S 1E.
– Move southern B-copter 3E.
Day 8:
– Begin capturing Forsythe’s HQ.
– Move Artillery 2N 2E.
– Move Sub 6E and dive.
– Move Rockets 1W.
– Move Mech 2E.
– Move southern Infantry 2E.
Day 9:
– Destroy enemy Mech with Rockets.
– Finish capturing Forsythe’s HQ.
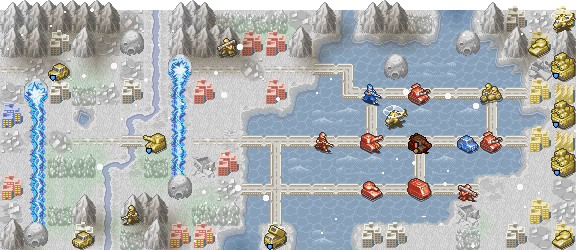
C15: Icy Retreat
Map Strategy
Maximum Score: 450 pts
150-pt. time limit: 9 days
100-pt. time limit: 18 days
Player CO: Brenner
Allied CO: Gage
Enemy CO(s): Waylon
Special Condition(s): Snow, Lazurian unit must reach allied city to complete
objective
Overview: Blast your way through Waylon’s forces as you escort the Lazurian Army to the target city. Your Anti-Air units will provide the bulk of the power score. The speed and technique score are not an issue on this map.
The improved version of this guide utilizes less luck manipulation and finishes one day faster by protecting the Recon from Waylon’s Recons, which allows Gage to move into the allied city unhindered.
Day 1:
– Move Rig 2N 3W.
– Load Infantry into Rig.
– Move Mech 1W.
– Move Tank 4W 1S and attack enemy Rockets from the north.
– Move eastern Anti-Air 4W and destroy enemy B-copter.
– Move remaining Anti-Air 4W 1N.
– Move Artillery 4W.
Day 2:
– Move Artillery 2W 1S.
– Move Tank 1N 3W and attack enemy Meteor.
– Move Mech 1W.
– Move eastern Anti-Air 5W.
– Move Rig 5W.
– Move remaining Anti-Air 4W 1S.
Day 3:
– Attack Meteor with Artillery.
– Move Tank 1S 1W.
– Move Rig 1W 3S and drop Infantry south.
– Move eastern Anti-Air 2S 1E and destroy enemy Rockets.
Day 4:
– Destroy Meteor with Artillery.
– Move Tank 2N 1W and attack enemy Artillery.
– Move northern Anti-Air 2S 2W and destroy enemy Artillery from the east.
– Move remaining Anti-Air 3W 2N.
– Load Infantry into Rig and move Rig 3N 2W.
Day 5:
– Save here.
– Move eastern Anti-Air 1W 3S and destroy enemy Infantry from the north. If
this does not happen, reload.
– Move remaining Anti-Air 4W.
– Move Rig 2W 2N and drop Infantry north.
Day 6:
– Load Infantry into Rig and move Rig 2W 1N.
– Move Artillery 1W.
– Move eastern Anti-Air 1E 2N and destroy enemy B-copter.
Day 7:
– Do nothing.
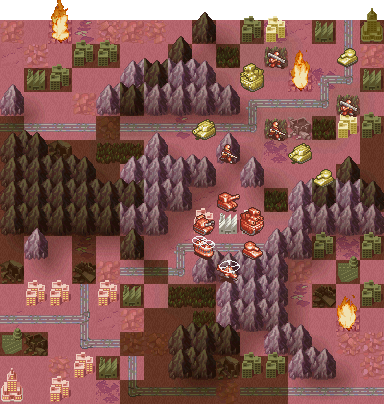
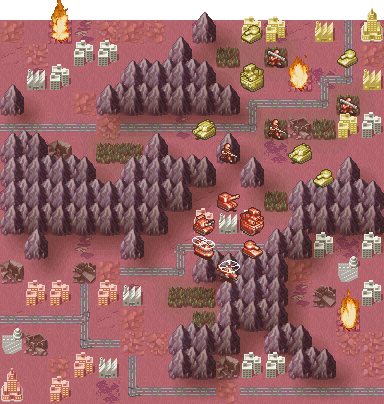
C16: Hope Rising
No Fog of War
Map Strategy
Maximum Score: 450 pts
150-pt. time limit: 8 days
100-pt. time limit: 16 days
Player CO: Will
Enemy CO(s): Greyfield
Special Condition(s): Fog of War
Overview: Hold off Greyfield’s forces for two days until Will enters the scene. Use a Will/Md Tank to mop up Greyfield’s forces while sending one loaded T-copter to Greyfield’s HQ. The high score strategy detailed below is fairly luck-intensive since Greyfield must follow specific movement, but it is possible.
The updated guide follows the same premise as its previous incarnation, except you are making your actions more carefully in order to manipulate Greyfield’s build order.
Day 1:
– Move northern Mech 2W.
– Move remaining Mech 1E 1S and begin capturing neutral city.
– Move western Infantry 3S and begin capturing neutral factory.
– Move remaining Infantry 3S.
– Move T-copter 4E 1N.
– Move B-copter 3E 3N.
Greyfield Day 1:
– Greyfield must move his units in such a way that he has a War Tank and two
Tanks around the fire.
Day 2:
– Finish capturing neutral properties.
– Load Infantry into T-copter, move T-copter 3E, and drop Infantry south.
– Move B-copter 3E 2N.
– Move War Tank 1E 1N.
– Move Artillery 1E.
– Move Tank 1N 1E.
– Move Anti-Air 1N 1E.
Greyfield Day 2:
– Your Mech must have 5 HP left.
Day 3:
– Save here. Simply move your units and find out if Greyfield built an
Anti-Air or Anti-Tank. If he built an Anti-Air, reload the save and continue
following the guide. If he built an Anti-Tank, restart the map. The HQ
capture is far more difficult if an Anti-Tank is built.
– Begin capturing neutral city with eastern Infantry.
– Attack enemy War Tank with Artillery.
– Attack enemy Md Tank with War Tank from the south. The War Tank must not
take any counterattack damage.
– Move B-copter 1S 1W.
– Move T-copter 2N.
– Load wounded Mech into T-copter.
– Move remaining Infantry 1E and begin capturing neutral city.
– Build Md Tank in factory.
Greyfield Day 3:
– Greyfield must move his wounded Md Tank, wounded War Tank, and wounded Tank
in the forests and ruin north of your position.
Day 4:
– Save here if the above happened.
– Finish capturing neutral properties.
– Load Will into Md Tank and move Will/Md Tank 2E 2N.
– Move B-copter 1N 5W.
– Move Tank 3N and destroy enemy Md Tank from the south.
– Move War Tank 3N and destroy enemy War Tank from the west.
– Move T-copter 2S 3W and drop Mech north.
– Move Anti-Air 1E 2N.
– Move Artillery 1E.
– Move Mech 2W.
Greyfield Day 4:
– Your Will/Md Tank and War Tank must not be attacked.
– Greyfield’s Tank must attack your wounded Mech.
– Greyfield’s Tank must attack your Tank.
– Greyfield’s Tank must attack your Anti-Air. It must end 4 – 9.
Day 5:
– Save if the above happened.
– Move Tank 3S 2W.
– Move B-copter 2E and destroy enemy Tank from the west.
– Attack enemy Tank with Artillery. It must have 2 HP left.
– Move War Tank 1E 1S EXACTLY and destroy enemy Md Tank from the west.
– Move Will/Md Tank 2N 1E and destroy enemy Anti-Air from the west.
– Load Infantry into T-copter and move T-copter 1W 4N.
– Move Anti-Air 3E 1N.
– Move wounded Mech 2S.
Day 6:
– Save here.
– Move T-copter 2E 3N 1W and drop Infantry north.
– Move B-copter 1N and destroy enemy Tank from the east.
– Move War Tank 2N 1E and destroy enemy Artillery from the west.
– Move Will/Md Tank 1E 3N and destroy enemy Anti-Air from the south.
– Move Anti-Air 1W.
– Move wounded Mech 2S.
Greyfield Day 6:
– His Mech must not attack your War Tank.
Day 7:
– Move Anti-Air 2E 1N.
– Move B-copter 1N 4E and attack enemy Mech from the north.
– Destroy enemy Flare from the south with Will/Md Tank.
– Destroy enemy Infantry from the west with War Tank.
– Begin capturing Greyfield’s HQ.
Day 8:
– Destroy enemy Flare from the south with Will/Md Tank.
– Destroy enemy Infantry from the west with War Tank.
– Move Artillery 3W 1S.
– Destroy enemy Tank with Tank from the south.
– Finish capturing Greyfield’s HQ.
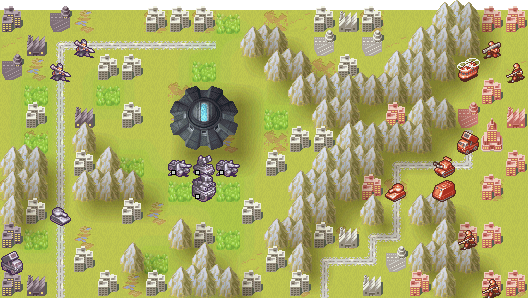
C17: The Creeper
Map Strategy
Maximum Score: 450 pts
150-pt. time limit: 6 days
100-pt. time limit: 12 days
Player CO: Tasha
Enemy CO(s): Tabitha
Special Condition(s): Destroy Talon Gun to complete objective
Overview: Build two Bombers, load Tasha into one of them, and rush the Talon Gun while escorting the Rockets with your Tank and Anti-Air. Specific movement with a loaded T-copter goads Tabitha into building enough units for the perfect technique score.
Day 1:
– Load Infantry into T-copter, move T-copter 2N 4W, and drop Infantry west.
– Move Tank 3S 3W.
– Move Anti-Air 3S 3W.
– Move Rockets 3W 2S.
Day 2:
– Begin capturing neutral factory with Infantry.
– Move Anti-Air 2S 2W.
– Move Rockets 3S 2W.
– Build Bomber in airport.
Day 3:
– Finish capturing neutral factory with Infantry.
– Move Bomber 3S 4W.
– Move Rockets 1S 3W.
– Move Tank 2W.
– Move Anti-Air 3W.
– Build Bomber in airport.
Day 4:
– Move Rockets 1N 1W.
– Move Tank 1N 1W.
– Move Anti-Air 1N 1W.
– Move western Bomber 1W.
– Load Tasha into Bomber and move Tasha/Bomber 2S 4W.
– Load Infantry into T-copter, move T-copter 6E, and drop Infantry south.
Tabitha Day 4:
– Tabitha should build a Mech, Infantry, and T-copter, bringing her unit count
to 17. If this happens, a perfect score is in your reach.
Day 5:
– Attack Anti-Tank with Rockets.
– If enemy Rockets in range of Tank or Anti-Air, retreat Anti-Air and Tank.
Day 6:
– Destroy Anti-Tank with Rockets.
– Move Tasha/Bomber 6W and destroy enemy Missiles from the east.
– Move Bomber 1N 6W and destroy Talon Gun.
C18: Panic in the Ranks
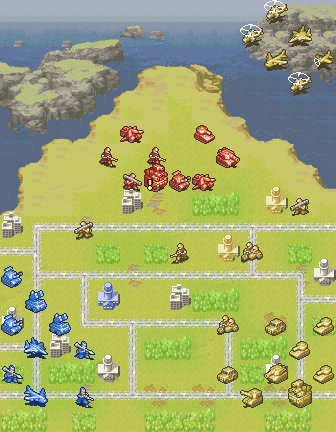
Map Strategy
Maximum Score: 365 pts
150-pt. time limit: 2 days
100-pt. time limit: 4 days
Player CO: Will
Allied CO: No CO
Enemy CO(s): Greyfield
Special Condition(s): None
Overview: Position your units in order to lure as many of Greyfield’s units into your ally’s firing range. Will uses his CO zone to maximize damage and eventually uses his CO power for the finishing blow.
Day 1:
– Move Will/War Tank 2S 1W.
– Move Anti-Air 2S 3W and destroy enemy Mech from the east.
– Move southern Anti-Tank 1W 1S.
– Move remaining Anti-Tank 1E 3S.
– Move eastern Infantry 3S.
– Move remaining Infantry 2S 1W.
– Move Mech 1S 1W.
– Save here.
– Move Md Tank 2W 3S and destroy Infantry from the north. Reload if this does
not happen.
– MOve Tank 1W 5S.
Day 2:
– Move Will/War Tank 3S 1W.
– Move Md Tank 2W 3S and destroy enemy Recon from the west.
– Move Anti-Air 2E 3S and destroy enemy Bike from the west.
– Move Tank 1S 1W.
– Move eastern Anti-Tank 4S.
– Move remaining Anti-Tank 2S.
– Move eastern Infantry 1W 2S.
– Move Mech 2S.
– Move remaining Infantry 1S.
– Save here.
Ally Day 2:
– His Anti-Air units should destroy Greyfield’s Recon.
Greyfield Day 2:
– His Md Tank and Tank should attack the southern Anti-Tank.
– His B-copters and Duster should attack the northern Anti-Tank.
Day 3:
– Move southern Anti-Tank 1S.
– Move remaining Anti-Tank 3S 1E and join with wounded Anti-Tank. It should
have at least 9 HP.
– Move Will/War Tank 3E and destroy enemy Tank from the west.
– Move Md Tank 3E 1N and destroy enemy Md Tank from the east.
– Move Anti-Air 1N 1E and destroy B-copter from the south.
– Move Mech 2S.
– Move northern Infantry 1N 2E and begin capturing neutral city.
– Move remaining Infantry 2E 1N.
– Save here.
– Move Tank 3S and attack enemy Tank from the north. Enemy Tank must have 4 HP
left. If this does not happen, reload.
Ally Day 3:
– His Bomber must not deal 8 HP of damage to enemy War Tank.
Greyfield Day 3:
– His War Tank should attack your Anti-Tank and be destroyed in the process.
– His Tank must attack the 5 HP Missiles. Ally’s Missiles must survive.
– His B-copter will attack your northern Infantry.
– His Bomber should attack Will/War Tank.
– His remaining Tank will attack your Anti-Tank.
Day 4:
– Use CO power.
– Destroy enemy Bike with Anti-Air.
– Move Md Tank 3E 3S and destroy enemy Mech from the west.
– Destroy adjacent enemy Tank with Mech.
– Move Tank 2E and attack enemy Tank from the south.
– Destroy enemy Tank with Anti-Tank.
Ally Day 4:
– He will destroy all remaining units.
C19: Salvation

Map Strategy
Maximum Score: 440 pts
150-pt. time limit: 2 days
100-pt. time limit: 5 days
Player CO: Gage
Enemy CO(s): None
Special Condition(s): None
Overview: Use the silos to weaken the enemy forces surrounding the enemy HQ. One specific enemy movement is needed for a clean HQ capture.
Day 1:
– Move western Infantry 2W 1S.
– Move central Infantry 2N.
– Move remaining Infantry 1E.
– Move western Mech 1E 1S and launch silo. Target the tile 2N of the War Tank.
– Move eastern Mech 2E.
– Move western Bike 3W 2N.
– Move central Bike 5N.
– Move eastern Bike 2E 1N and launch silo. Target the tile 1W 1N of the War
Tank.
– Move Recon 2W 3N.
– Move Tank 5N.
Enemy Day 1:
– Enemy must join his units in such a way that the only units within range of
the enemy HQ are a Mech 1N 1W of the HQ and an Infantry on the HQ.
Day 2:
– If the above happens, save here.
– Move western Bike 2N 2W and launch silo. Target the HQ.
– Move western Infantry 2N 1W and launch silo. Target the HQ.
– Move eastern Bike 2E 2N and launch silo. Target the tile 1N 2W of eastern
Bike.
– Move western Mech 2N.
– Move western Infantry 1S 1W.
– Move Recon 2S 5W.
– Move remaining Infantry 2S 1E.
– Move remaining Mech 2E.
– Move Tank 2E 3N and destroy enemy Infantry from the west.
– Move remaining Bike 5N and begin capturing enemy HQ.
Enemy Day 2:
– Capturing Bike must not take any damage.
– None of your units can be destroyed.
Day 3:
– Finish capturing enemy HQ.
C20: Waylon Flies Again
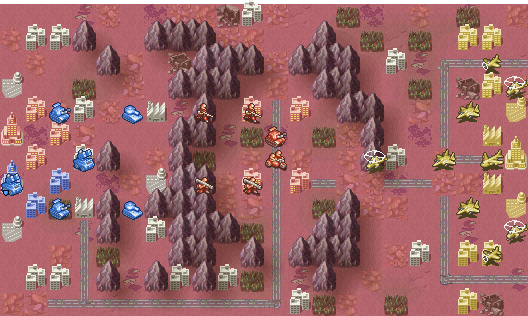
Map Strategy
Maximum Score: 438 pts
150-pt. time limit: 10 days
100-pt. time limit: 21 days
Player CO: Will
Allied CO: Tasha
Enemy CO(s): Waylon
Special Condition(s): None
Overview: This mission pits Will’s skeleton forces against the considerable air force commanded by Waylon. The opening strategy detailed here holds off Waylon’s air force and destroys a Duster, a B-copter, and a Bomber if Waylon decides to ignore the Missile unit. You will be forced to concede the central area and capture the nearby factory and airport. Once the airport is captured, a Will/Fighter can be built, which will force Waylon to retreat the remnants of his air force. Take this opportunity to capture the neutral properties in the western region and regain control of the center. Use the funds to build a Tank force in the southern factory and Fighters/Bombers in the airport.
Tasha’s Missiles is key to surviving the onslaught. Waylon does not like sending his units into its range unless he has a good reason,
like beating the crap out of your Will/Fighter. However, the Will/Fighter can take two hits before falling, and this allows you the opportunity to swat the rest of Waylon’s air units out of the sky. After the air force is all but wiped out, Tasha’s units are
fodder and can be safely ignored.
Day 1:
– Move eastern Infantry 2W and begin capturing neutral factory.
– Move remaining Infantry 2W.
– Move eastern Mech 2W and begin capturing neutral airport.
– Move remaining Mech 2W.
– Move Bike 5S.
– Move Anti-Air 5S.
Day 2:
– Finish capturing neutral properties.
– Move Infantry 3W.
– Move Mech 1W 1S.
– Move Bike 2W and begin capturing neutral city.
– Move Anti-Air 2S 3W.
Day 3:
– Move eastern Infantry 3W.
– Move remaining Infantry 3W and begin capturing neutral city.
– Move northern Mech 2W.
– Move southern Mech 1W 1S and begin capturing neutral city.
– Move Bike 1S 4W.
– Move Anti-Air 3W 3N.
– Build Fighter in airport.
– Build Infantry in factory.
Waylon Day 3:
– It is suggested, but not mandatory, that Waylon attacks your Infantry instead of Tasha’s Missiles.
Day 4:
– Continue and/or finish capturing neutral city.
– Move Infantry 1N 2W and begin capturing neutral airport.
– Move Mech 1W 1S and begin capturing neutral factory.
– Move Bike 1N 4E and begin capturing neutral city.
– Load Will into Fighter and destroy the westernmost enemy air unit, which is usually a Duster.
– Move Anti-Air 3S 3E.
– If wounded, move Infantry 3E and join with wounded Infantry. Else, move Infantry 2N 1E.
– Build Infantry in factory.
Tasha Day 4:
– Tasha should destroy the Bomber with her Missiles.
– Tasha should destroy the B-copter with her Anti-Air.
Day 5:
– Continue and/or finish capturing neutral properties.
– Move Mech 2S.
– Move Anti-Air 3E 3N.
– Move Infantry 2N 1E.
– If Will/Fighter can destroy another air unit, do so. Else, keep it within the range of Tasha’s Missile.
Waylon’s AI is too erratic to maintain the D2D. However, the stage is set for
the win.
Capture all of the neutral properties in the western area and center. When
everything is captured, Will should have 23 properties, which is enough to
build a decent force.
The key to winning this map is a balanced force. If you focus too much on
Bombers and Fighters, Waylon will begin to build Anti-Air units, making it
difficult to enter his territory. Build Tanks to remedy the situation.
You should keep two Fighters in the air at all times. You only need one or two
Bombers to force your way into Waylon’s area, and keep building Tanks from
the southern factory.
Most of the time, Waylon builds a Duster in order to load himself into it the
following turn. Compensate for this by keeping your Anti-Air unit within range
of the Will/Fighter, because the AI loves to wipe out CO units.
C24: Crash Landing

Map Strategy
Maximum Score: 450 pts
150-pt. time limit: 6 days
100-pt. time limit: 12 days
Player CO: Lin
Enemy CO(s): Penny
Special Condition(s): None
Overview: This guide requires a considerable amount of luck, akin to the amount required for Metro Map. Most of it is needed on Day 1. Therefore, do not attempt this guide if you feel you lack the patience for a number of reloads. On the other hand, that perfect score is very tempting.
On Day 3, the movement of your western War Tank depends on the position of the enemy. Keep that in mind.
On Day 4, the enemy movement ends up being random. This shouldn’t matter, as most of the luck-intensive part is over.
A 5-day strategy exists, but it requires even more luck than this strategy. If there is sufficient demand, I will update this guide with that D2D.
Day 1:
– Attack enemy War Tank with Artillery.
– Destroy War Tank with Anti-Tank.
– Move Rig 2N 3W.
– Move Recon 2E 5N.
– Move western Rockets 4S.
– Move western War Tank 2N 2E and destroy enemy Artillery from the west.
– Move western Anti-Air 3N 1E and destroy Bike from the south.
– Save here.
– Move western Md Tank 3W 1S and destroy enemy Recon from the north. If this does not happen, reload.
– If the above happens, save here.
– Move Mech 1S 1E and attack enemy Anti-Tank from the south. It must end 8 – 4 in your favor.
– If the above happens, save here.
– Attack enemy Tank with remaining Rockets. You must deal at least 78% damage on the attack.
– Destroy enemy Tank with remaining Anti-Air from the west.
– If the above happens, save here.
– Destroy enemy Anti-Air from the east with Md Tank. If this does not happen, reload.
– If the above happens, save here.
– Move eastern Tank 2W 2S and attack enemy Tank from the east. It must end 8 – 4 in your favor.
– Move remaining Tank 3N 2W and destroy enemy Tank from the south.
– Move War Tank 2N 1W and destroy enemy Recon from the east.
– Save here.
Penny Day 1:
– Her War Tank will attack your War Tank. It must end 7 – 5.
– Your Anti-Air must survive.
– Your Tank must survive.
Day 2:
– Move Mech 2W and destroy enemy Anti-Tank from the east.
– Move Anti-Air 1E 5S and destroy enemy Mech from the north.
– Attack enemy Tank with eastern Rockets.
– Move healthy eastern Tank 2S and destroy enemy Tank from the north.
– Attack enemy Md Tank with western Rockets.
– Destroy enemy Md Tank with Md Tank from the south.
– Move western War Tank 2W 1S and destroy enemy Infantry from the east.
– Move Artillery 5W.
– Move remaining Md Tank 4E 1S.
– Move Anti-Tank 4E.
– Move Recon 2S 1E.
– Move remaining War Tank 1N.
– Move Rig 5E 1S and supply nearby units.
– Move 1 HP Anti-Air 2N 1W.
– Save here.
Penny Day 2:
– Her War Tank will attack your War Tank. Your War Tank must survive.
Day 3:
– If the above happens, save here.
– Destroy enemy War Tank with Anti-Tank.
– Move eastern Md Tank 5E and destroy enemy Rockets from the south. Reload if this does not happen.
– Attack northern enemy Tank with Artillery.
– Destroy northern enemy Tank with western Rockets.
– Move eastern Tank 4E 2S and destroy enemy Rockets from the west. Reload if this does not happen.
– Move eastern Anti-Air 5E and attack enemy Rockets from the west.
– Move Mech 2E and destroy enemy Rockets from the west.
– Move 1 HP War Tank 1E 1N.
– Move Recon 2E 3N.
– Move eastern Rockets 2S 3E.
– Move Rig 3E and supply nearby units.
– Move remaining Md Tank 1N 1W and attack enemy Tank from the north. This must end 10 – 2 in your favor.
– If enemy Tank is located 1E of Rockets, destroy it with War Tank from the south or east.
– If enemy Tank is located 1S of Rockets, destroy it with War Tank from the east.
– Move Anti-Air in such a way that it cannot reach your Rockets.
Penny Day 3:
– Her Tank must destroy your Anti-Air.
– Her left central Rockets must spawn 1S of your western Rockets.
Day 4:
– Destroy enemy Tank with western War Tank.
– Move eastern Tank 5N 1E and destroy enemy Rockets.
– Move Mech 2W.
– Move 1 HP War Tank 4W.
– Move Anti-Air 6W.
– Move Anti-Tank 3E.
– Attack enemy Tank with Rockets.
– Attack enemy Tank with Md Tank from the west. This must end 10 – 2 in your favor.
– Move Recon 1E.
– Move Rig 2W and supply nearby units.
– Attack northern enemy Rockets with Artillery.
– Destroy northern enemy Rockets with Rockets.
– Destroy southern enemy Rockets with Md Tank from the north.
Day 5:
– Save here.
– Destroy any enemy Tank in range with Rockets.
– Destroy any enemy Tank with Mech.
– Destroy any enemy Tank in range with Anti-Tank.
– Destroy enemy Rockets with War Tank from the east.
– Destroy northern enemy Rockets with western Rockets.
– Destroy southern Rockets with Tank.
– Destroy northern Rockets with eastern Md Tank from the south.
– Destroy middle Rockets with western Md Tank.
– Position your units in such a way that western Md Tank and War Tank can destroy the last of Penny’s units.
Day 6:
– Destroy eastern enemy Rockets with War Tank or Md Tank.
– Destroy western enemy Rockets with Md Tank or Tank.
C26: Sunrise
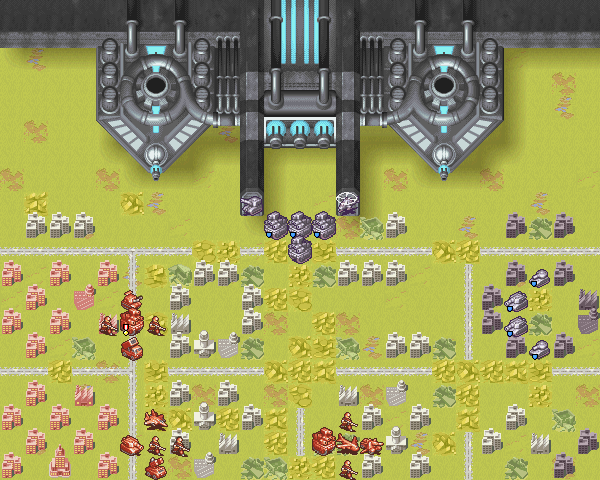
Map Strategy
Maximum Score: 439 pts
150-pt. time limit: 4 days
100-pt. time limit: 9 days
Player CO: Will
Enemy CO(s): Caulder
Special Condition(s): Destroy the five laser cannons to complete objective
Overview: Every single unit at Will’s disposal is used to manage the high score in the final mission in Advance Wars: Days of Ruin. The CO unit, Rockets, War Tank, Anti-Tank, and Bomber are used to destroy the five laser cannons while the Infantry are used to distract the enemy units and capture the three com towers in the area. The Fighter pummels the air units the Nest deploys, while the Missiles, Anti-Air, and one Infantry distract the left mortar.
There is one instance of luck needed. The rest of the walkthrough relies on AI peculiarities to succeed.
Day 1:
Northwest Section
– Move western Infantry 3E and begin capturing neutral factory.
– Move eastern Infantry 2E 1S and begin capturing neutral com tower.
– Move Anti-Air 5S 1W.
– Move Will/War Tank 3E 1N.
– Move Rockets 4N 1W.
Southwest Section
– Move Fighter 6E 3N.
– Move Md. Tank 5E.
– Move western Infantry 3W.
– Move eastern Infantry 1E 1N and begin capturing neutral com tower.
– Move Missiles 2W.
Southeast Section
– Move War Tank 3N.
– Move Anti-Tank 3N 1W.
– Move northern Infantry 3N.
– Move southern Infantry 2E 1N and begin capturing neutral com tower.
– Move Bomber 7N.
Day 2:
– Finish capturing all neutral com towers.
– Save here.
– Move Fighter 6N 1E and attack enemy Fighter from the west. This must end 9 – 3 in your favor. If this does not happen, reload.
– Move Bomber 2N and attack enemy War Tank from the east. This must end 10 – 2 in your favor. If this does not happen, reload.
– Move Rockets 2N 1W.
– Move northwestern Infantry 2N 1E and begin capturing neutral city.
– Move Will/War Tank 1E 1N and attack enemy War Tank from the west.
– Move War Tank 1E 3N.
– Move Anti-Tank 4N.
– Move northeastern Infantry 2N 1W.
– Move Md Tank 5N.
Caulder Day 2:
– His Md Tank must attack your capturing Infantry.
Day 3:
– Save here.
– Move Rockets 1N 1W.
– Move northernmost Infantry 1S 1W and begin capturing neutral city.
– Move northewestern Infantry 2N 1W and join with wounded Infantry.
– Move Will/War Tank 2N 1E and destroy enemy Missiles from the south.
– Move Md. Tank 4N 1E.
– Move Fighter 1W 2S and destroy enemy B-copter from the west.
– Move Bomber 4E 2N and attack easternmost laser cannon from the south.
– Move Anti-Tank 2N 2W.
– Move War Tank 3N.
– Move northeastern Infantry 2N 1E.
– Move south central Infantry 1N 1E and begin capturing neutral city.
Caulder Day 3:
– His 4 HP War Tank must suicide on your War Tank.
– His Fighter must not attack your Bomber from the east.
Day 4:
– Attack westernmost laser cannon with Rockets.
– Move Will/War Tank 1E 3N and attack west central laser cannon.
– Move Md. Tank 1E 3N and attack central laser cannon.
– Move Anti-Tank 2N.
– Move War Tank 1W 3N and attack east central laser cannon.
– Move Fighter 2N 1E and destroy enemy B-copter from the west.
– Move northeastern Infantry 1N.
– Move Bomber 2S 5W.
– Move northwestern Infantry 1E 2S.
Day 5:
– Destroy westernmost laser cannon with Rockets.
– Move Will/War Tank 1S.
– Move Md. Tank 1W and destroy west central laser cannon.
– Move War Tank 1W and destroy central laser cannon.
– Destroy east central laser cannon with Anti-Tank.
– Destroy enemy Fighter with your Fighter.
– Move Bomber 5E 2N and destroy easternmost laser cannon.
Campaign
- C01: Days of Ruin
- C02: A Single Life
- C03: Freehaven
- C04: Moving On
- C05: New Allies
- C07: A Kind of Home
- C08: A New Threat
- C09: The Beast
- C10: Almost Home
- C11: A Storm Brews
- C12: History of Hate
- C13: Greyfield Strikes
- C14: A Hero’s Farewell
- C15: Icy Retreat
- C16: Hope Rising
- C17: The Creeper
- C18: Panic in the Ranks
- C19: Salvation
- C20: Waylon Flies Again
- C24: Crash Landing
- C26: Sunrise
Caulder
| Army: Intelligent Defence Systems |  |
| The head of the private military contractor IDS. He seeks a world where he is free to carry out his terrible experiments. | |
| “Fascinating…” | |
| Unlock: Complete C26 “Sunrise” – Not Available in Random WiFi Games |
| CO Zone Units: All Units | |
| CO Zone: 3 | |
| Attack Boost: +60% | |
| Defence Boost: +60% | |
| Zone Effect: Repairs 5 HP at the start of turn | |
Damage Changes from AW:DS to AW:DoR
This is an abbreviated list of the unit damage changes from Advance Wars: Dual Strike to Advance Wars: Days of Ruin. It is particularly helpful to see how the roles of units have changed between the two games.
| Attacking Unit | Defending Unit | Damage Change | AW3 Damage | AW4 Damage |
|---|---|---|---|---|
 Anti-Air Anti-Air |  Tank Tank | -10 | 25% | 15% |
 Anti-Air Anti-Air |  AW3 Mid Tank/AW4 War Tank AW3 Mid Tank/AW4 War Tank | -5 | 10% | 5% |
 Anti-Air Anti-Air |  Bomber Bomber | -5 | 75% | 70% |
 Anti-Air Anti-Air |  Fighter Fighter | +5 | 65% | 70% |
 Anti-Air Anti-Air |  Transport Copter Transport Copter | +15 | 105% | 120% |
 Battle Copter Battle Copter |  Anti-Air Anti-Air | -15 | 25% | 10% |
 Battle Copter Battle Copter |  Mech Mech | -10 | 75% | 65% |
 Battle Copter Battle Copter |  Missiles Missiles | -10 | 65% | 55% |
 Battle Copter Battle Copter |  Transport Copter Transport Copter | -10 | 95% | 85% |
 Battle Copter Battle Copter |  AW3 Mid Tank/AW4 War Tank AW3 Mid Tank/AW4 War Tank | +10 | 25% | 35% |
 Battle Copter Battle Copter |  Rockets Rockets | +10 | 65% | 75% |
 Battle Copter Battle Copter |  APC/Rig APC/Rig | +10 | 60% | 70% |
 Battle Copter Battle Copter |  Tank Tank | +15 | 55% | 70% |
 Battle Copter Battle Copter |  Recon Recon | +20 | 55% | 75% |
 Bomber Bomber |  AW3 Mid Tank/AW4 War Tank AW3 Mid Tank/AW4 War Tank | -20 | 95% | 75% |
 Bomber Bomber |  Anti-Air Anti-Air | -10 | 95% | 85% |
 Bomber Bomber |  Missiles Missiles | -10 | 105% | 95% |
 Bomber Bomber |  Infantry Infantry | +5 | 110% | 115% |
 Infantry Infantry |  Artillery Artillery | -5 | 15% | 10% |
 Infantry Infantry |  Rockets Rockets | -5 | 25% | 20% |
 Infantry Infantry |  Missiles Missiles | -5 | 25% | 20% |
 Infantry Infantry |  Anti-Air Anti-Air | -2 | 5% | 3% |
 Infantry Infantry |  Battle Copter Battle Copter | +1 | 7% | 8% |
 Mech Mech |  Anti-Air Anti-Air | -10 | 65% | 55% |
 Mech Mech |  Battle Copter Battle Copter | +3 | 9% | 12% |
 Missiles Missiles |  Battle Copter Battle Copter | +5 | 115% | 120% |
 Missiles Missiles |  Transport Copter Transport Copter | +5 | 115% | 120% |
 Recon Recon |  Tank Tank | +2 | 6% | 8% |
 Recon Recon |  Anti-Air Anti-Air | +4 | 4% | 8% |
 Recon Recon |  Infantry Infantry | +5 | 70% | 75% |
 Recon Recon |  Battle Copter Battle Copter | +8 | 10% | 18% |
 Recon Recon |  Missiles Missiles | +27 | 28% | 55% |
 Rockets Rockets |  Anti-Air Anti-Air | -10 | 85% | 75% |
 Rockets Rockets |  Tank Tank | -10 | 80% | 70% |
 Rockets Rockets |  AW3 Mid Tank/AW4 War Tank AW3 Mid Tank/AW4 War Tank | -10 | 55% | 45% |
 Rockets Rockets |  Missiles Missiles | -5 | 90% | 85% |
 Tank Tank |  AW3 Mid Tank/AW4 War Tank AW3 Mid Tank/AW4 War Tank | +5 | 15% | 20% |
 Tank Tank |  Battle Copter Battle Copter | +8 | 10% | 18% |
 Tank Tank |  Anti-Air Anti-Air | +10 | 65% | 75% |
 AW3 Mid Tank/AW4 War Tank AW3 Mid Tank/AW4 War Tank |  Battle Copter Battle Copter | +23 | 12% | 35% |
Davis
| Army: New Rubinelle Army |  |
| A member of the New Rubinelle Army. Fearful of Greyfield and a bit of a coward. | |
| “Aw man. This ain’t good, man…” | |
| Unlock: Campaign only |
Event Illustration Art

You can download all the CGI background illustrations used in event scenes in the Campaign here. Includes some campaign scene spoilers.
Download Link (3.2 MB)Forsythe
| Army: Lazurian Army |  |
| The Lazurian Army commander. He was called out of retirement to defend his nation. | |
| “I am a soldier, not a killer.” | |
| Unlock: Complete C14 “A Hero’s Farewell” |
| CO Zone Units: All Units | |
| CO Zone: 5 | |
| Attack Boost: +20% | |
| Defence Boost: +20% | |
Gage
| Army: Lazurian Army |  |
| A Lazurian soldier. He is a man of few words, but a consummate professional. | |
| “They don’t pay me to think.” | |
| Unlock: Complete C13 “Greyfield Strikes” |
| CO Zone Units: Indirect Units, Naval Units | |
| CO Zone: 2 – 3 – 4 | |
| Attack Boost: +30% | |
| Defence Boost: +20% | |
| Enhances all indirect unit’s attack range | |
| Unit Ratings: • Indirect Combat Units: +2 Firing Range | |
Greyfield
| Army: New Rubinelle Army |  |
| Ambitious and power hungry, he wants to destroy the Lazurian Army and rule the world as its new king. | |
| “I’ll see you hanged for this!” | |
| Unlock: Complete C21 “Lin’s Gambit” |
| CO Zone Units: Copter Units, Naval Units, Seaplane Units | |
| CO Zone: 3 – 4 – 5 | |
| Attack Boost: +20% | |
| Defence Boost: +50% | |
| Fuel, ammo and materials are restocked to maximum for all units. Supply Chain is the only method to restock materials under any circumstances. | |
| Effect on CO Power Activation: • All units have their fuel, ammo and materials supplied to maximum | |
Isabella
| Army: 12th Battalion |  |
| Has no memory of her past. Rescued by Will, she has joined the 12th Battalion – where she dreams of living in peace. | |
| “I can’t remember anything…” | |
| Unlock: Starts unlocked |
| CO Zone Units: All Units | |
| CO Zone: 2 – 3 – 4 | |
| Attack Boost: +20% | |
| Defence Boost: +20% | |
| Enhances all units’ movement and indirect attack range | |
| Unit Ratings: • All Units: +2 Movement • Indirect Combat Units: +2 Firing Range | |
Lin
| Army: 12th Battalion |  |
| The 12th Battalion’s unflappable second in command. She has tremendous respect for Captain Brenner, although they disagree often. | |
| “Keep a cool head.” | |
| Unlock: Starts unlocked |
| CO Zone Units: Ground Units | |
| CO Zone: 1 – 2 – 3 | |
| Attack Boost: +30% | |
| Defence Boost: +30% | |
| Enhances all units’ vision range and can view obscured tiles. | |
| Modified Stats: • Vision: +2 • Forest and Reef tiles are revealed when in vision range without requiring an adjacent unit | |
Multiplayer Information
General Multiplayer
These articles cover the basics and are applicable to any version of the game.
Getting Started
- Introduction
- Glossary of Short Terms
- Naming Philosophy
AW4 mechanics
- Interface
- Anatomy of a day
- Mechanics (vitals, damage, leveling)
- COs, COUs, COPs, and the zone system
- Terrain and weather
- Gas trick
- Other things
AW3 to AW4 differences
- Mechanics and unit changes
- DEF shift
- Base damage changes
Competitive Multiplayer
These articles are more in-depth, but more importantly, they assume that players are using the AW4 Balance Patch. This changes the statistics of the commanding officers (COs) and assumes various game settings. As of May 2020, all online competitive play uses the AW4 Balance Patch.
The World of Intelligent Defense
- Introduction & How to find games
- Standard game settings
- Why are sea units not played?
- It’s not just about winning
- Myths and assumptions debunked
COs
| CO | Zone | Effect | Power |
| Brenner | 3 | 110/130 all | +3 HP all |
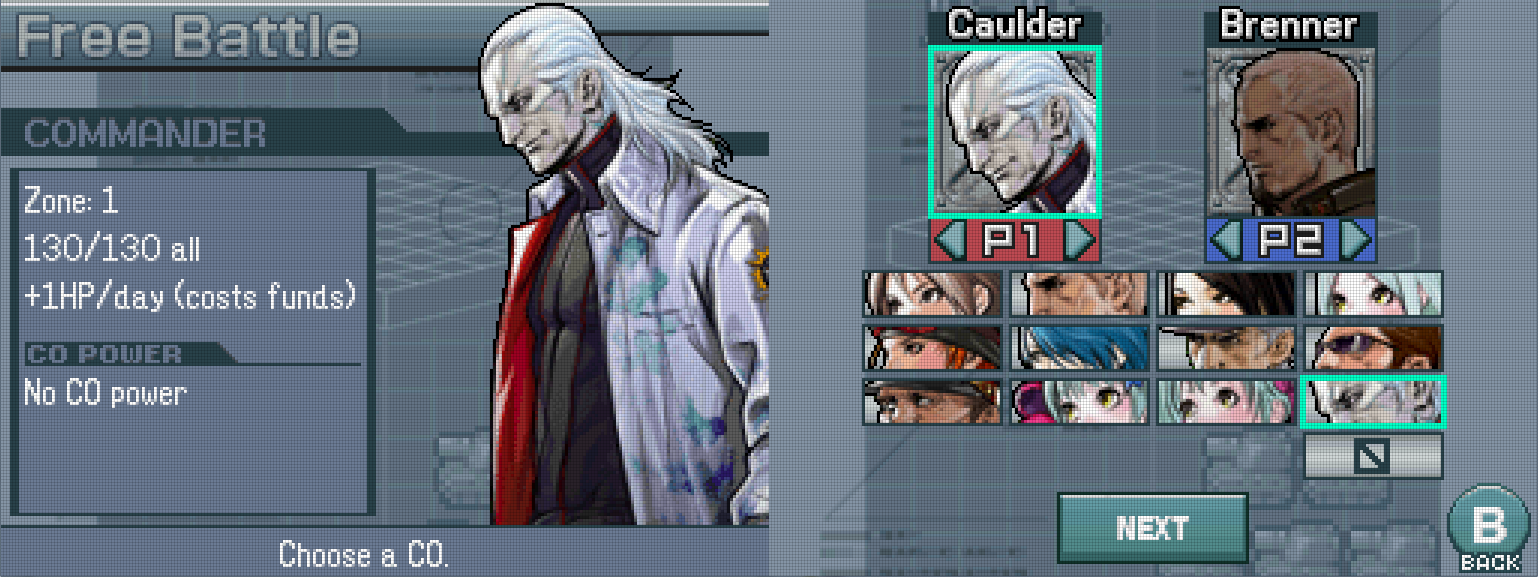
| Caulder | 1 | 130/130 all, +1 HP/day (costs funds) | None |
| Gage | 2 | 140/130 indirect, 110/110 other | +2 indirect range |
| Greyfield | 3 | 140/120 tech, 110/110 other | Supply all units (incl. materials) |
| Forsythe | 5 | 120/130 all | None |
| Isabella | 2 | 120/110 all | +2 MP all, +2 indirect range |
| Lin | 1 | 130/130 land, 110/110 air | +2 vision land, hidden tiles revealed |
| Penny | 3 | 120/120 all | Weather change for 3 days |
| Tabitha | 0 | 170/160 all (190/180 COU) | 8 HP 2-radius nuke (cost bias) |
| Tasha | 1 | 160/140 air, 110/110 land | +2 MP air |
| Waylon | 2 | 130/160 air, 110/110 land | +270D air |
| Will | 2 | 130/110 direct land, 110/110 other | +2 MP direct land |
Units
- Soldiers (infantry, bike, mech)
- Core (antiair, tank, copter, artillery)
- Tech (mdtank, wartank, rockets, bomber, duster)
- Niche (recon, flare, antitank, missiles, fighter)
- Transport (t-copter, rig)
Theory
- Cost efficiency
- Direct-fire folly
- First turn advantage
- Hard and soft counters
- Indirect clusters and lines
- Material advantage
- Tech units
- The 1HKO
- Unit count
Strategy
- Banking
- Capturing
- Chip damage
- City support
- CO units
- Double teaming
- Forced leveling
- Joining
- Mopping up
- Offensive COU push
- Parallel formation
- Shielding
- Turtling
- Wall busting
- Zone advantage
- Zone management
Charts
Penny
| Army: Intelligent Defence Systems |  |
| The youngest child of Dr. Caulder. Numerous experiments have left her mind permanently shattered. | |
| “Tee hee! Let’s go, Mr. Bear!” | |
| Unlock: Complete C24: “Crash Landing” |
| CO Zone Units: All Units | |
| CO Zone: 3 – 4 – 5 | |
| Attack Boost: +10% | |
| Defence Boost: +10% | |
| Zone Effect: Immunity to all Weather effects (Snow, Rain, Sandstorm). Active even when CO Unit is not deployed. | |
| Changes the weather to either Snow, Rain or Sandstorm. | |
| Effect on CO Power Activation: • Current weather is set to either Snow, Rain or Sandstorm for 3 full days | |
T01: Extreme Edge
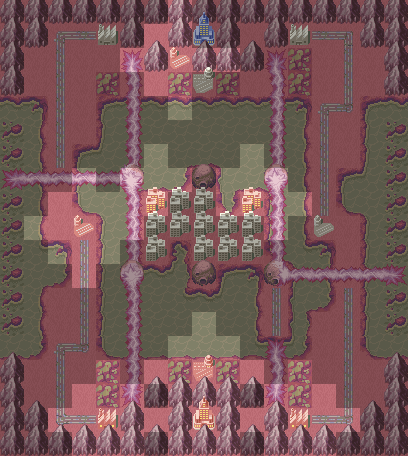
Maximum Score: 430 pts
150-pt. time limit: 5 days
100-pt. time limit: 10 days
Player CO: Lin
Enemy CO(s): Waylon
Special Condition(s): Fog of War
Overview: Two T-copters (one loaded) and a Lin/B-copter are sent to Waylon’s HQ while the Lin/B-copter provides the power score. One T-copter is sacrificed in order to make the capture, while the remaining T-copter is used to reveal the unlucky enemy T-copter needed for destruction.
T02: Shade Coast
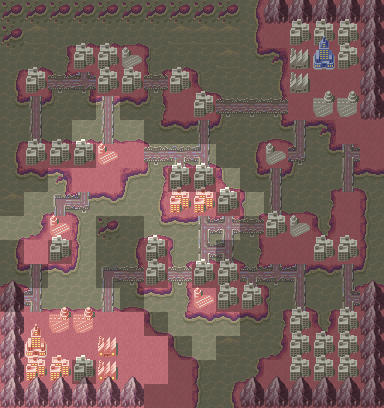
Maximum Score: 450 pts
150-pt. time limit: 12 days
100-pt. time limit: 25 days
Player CO: Lin
Enemy CO(s): Gage
Special Condition(s): Fog of War
Overview: The previous guide relied on an aerial route. This faster strategy relies on two Bikes, one loaded with Lin, one Recon, and one Anti-Air to storm Gage’s HQ. A B-copter is deployed in order to distract the Duster. The Anti-Air provides the entire power score.
T09: Hourglass
Trial Maps Guide
T9: Hourglass
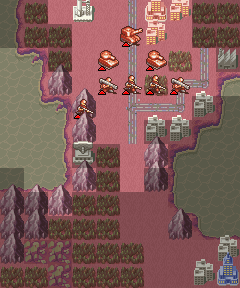
Move over the image to show the map without Fog of War.
Continue reading
T11: Star Islands
Trial Maps Guide
T11: Star Islands
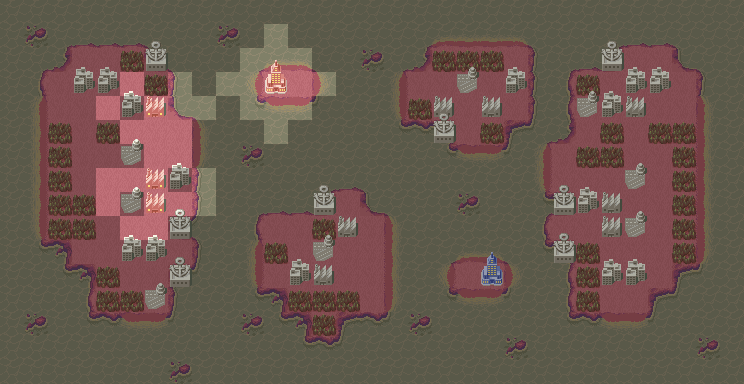
Move over the image to show the map without Fog of War.
Continue reading
